
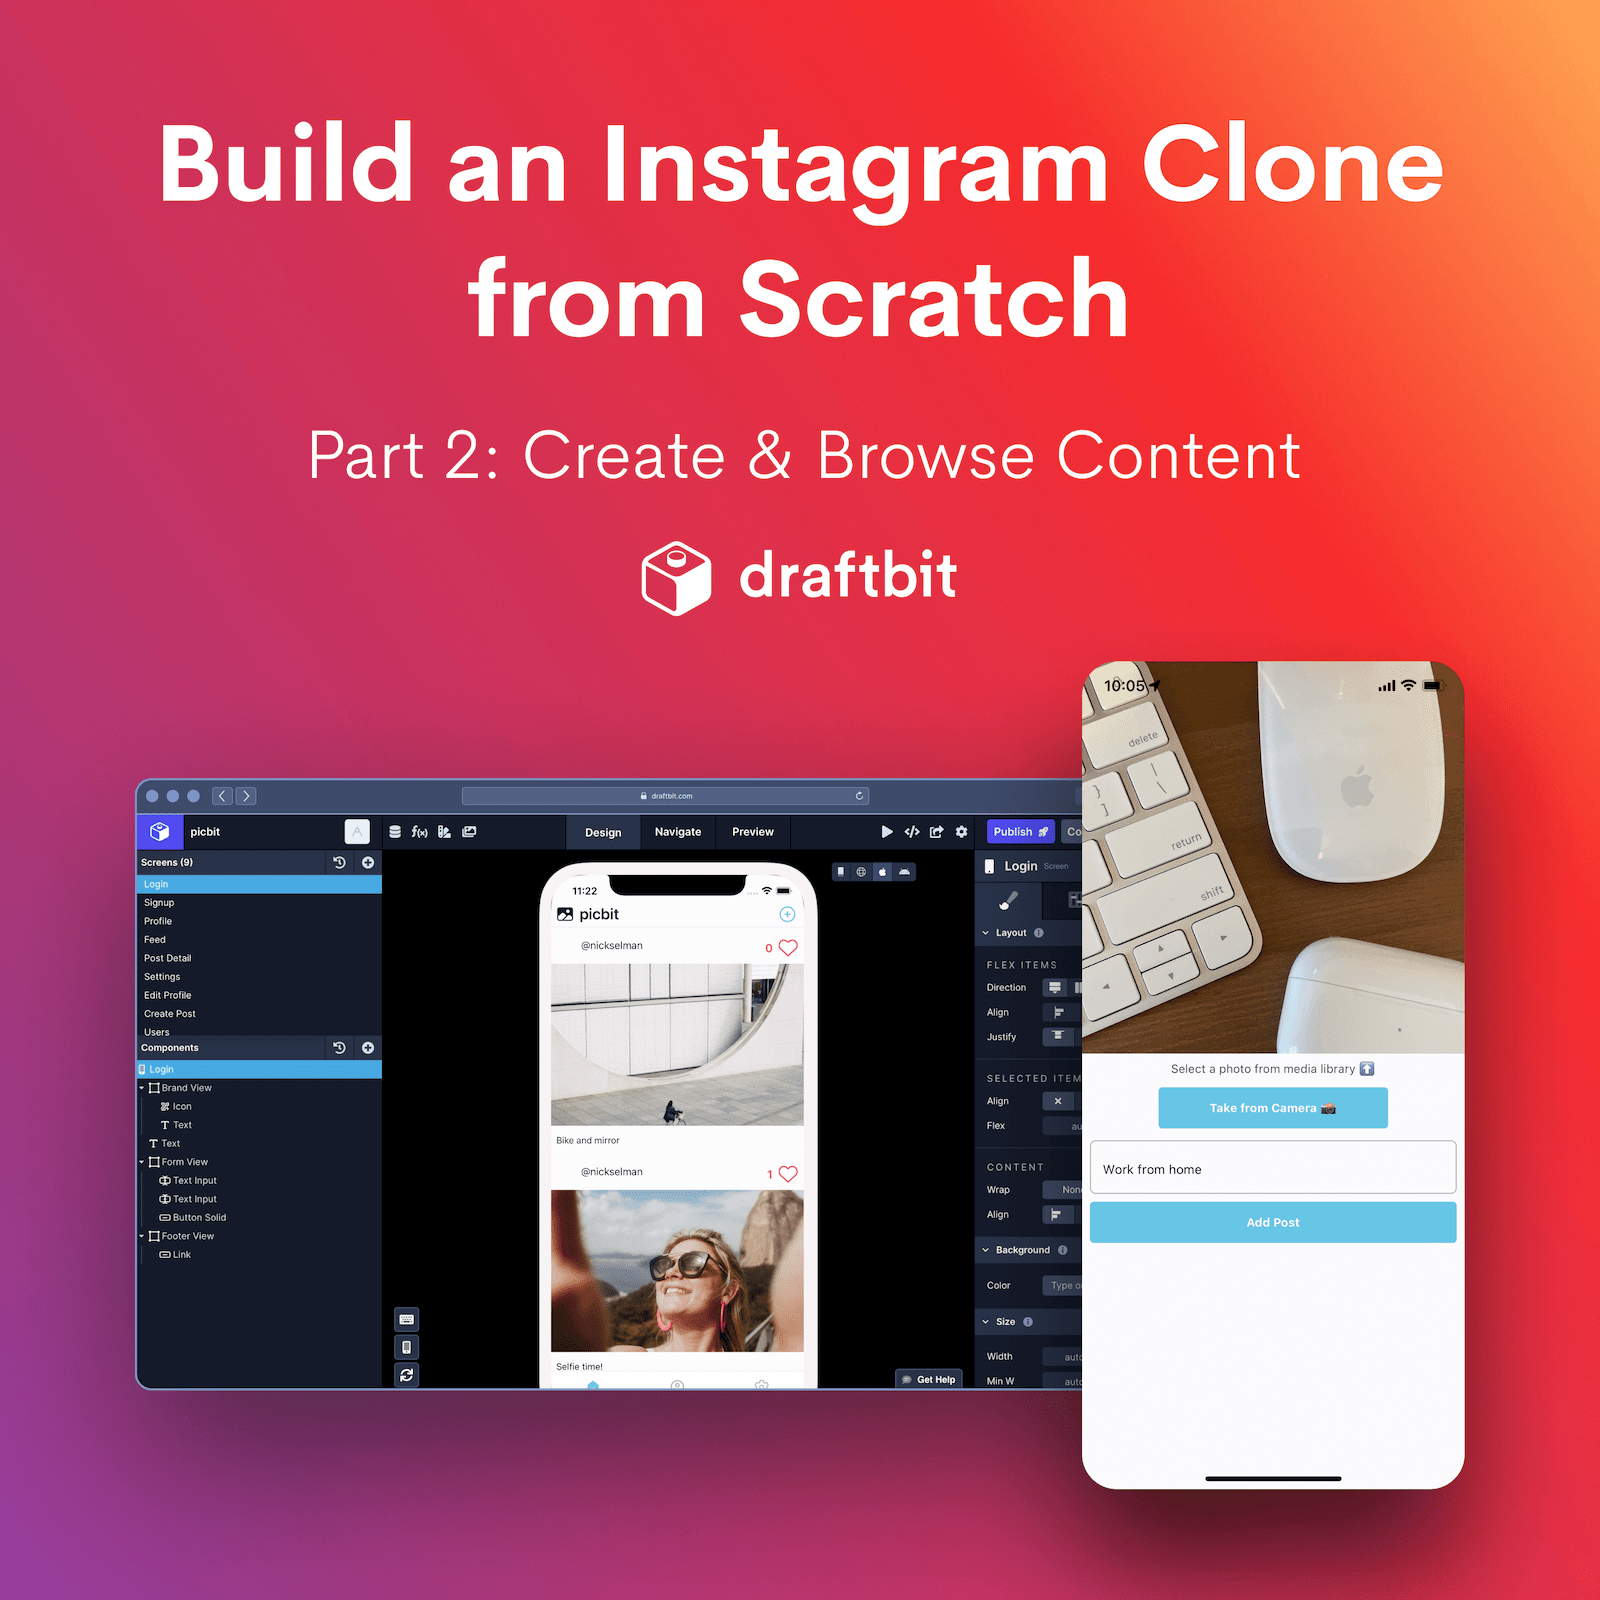
Building an Instagram Clone from Scratch with No-Code, Part 2: Create & Browse Content
In this 3-part tutorial series, we provide step-by-step instructions for creating an Instagram clone from scratch using no-code tools Draftbit and Xano. In Part 2, we will build content creation and browsing functionality (create new post, see posts).
About this tutorial series
In this series of tutorials, we will create a full-stack Instagram clone app with Draftbit and Xano. At the end of this 3-part tutorial series, you will have built a fully-functional Instagram clone (we’ll call it Picbit) that allows your users to sign up, login, create posts to their profile, and like and comment on other peoples’ posts. This series is divided into three parts:
- Setting up Authentication: Sign Up, Sign In, and Log Out
- (You are here) Uploading a photo and Creating a Feed screen
- Adding Likes, Comments, and Follow a user
Draftbit is a visual programming app builder whose interface will build the mobile app with native code running in the background. The app itself is cross-platform and will run on both iOS and Android. We will also use Xano, which is a no-code scalable and secure backend.
Part 2: Uploading a photo and creating a feed screen
In this tutorial, let’s continue to build our Instagram clone. We will build features like uploading a user’s profile image using a device’s media library, uploading a photo and creating an Instagram like post with captions using both a device’s media library and camera and display those photos in a scrollable list.
All the API endpoints from Xano’s photo-sharing backend template we will add to the Draftbit app will require a user to be authorized.
Here is an example that shows how to upload a photo to Xano’s database and display it in a scrollable list built in Draftbit:
Here is another example of uploading a user’s profile image on an iOS simulator using Draftbit.
Let’s dive in.
Prerequisites
- A Draftbit account to build the cross-platform mobile app.
- A Xano account to access and use their free and scalable photo-sharing API that is accessible via their marketplace.
How to create a user’s profile image upload endpoint in Xano
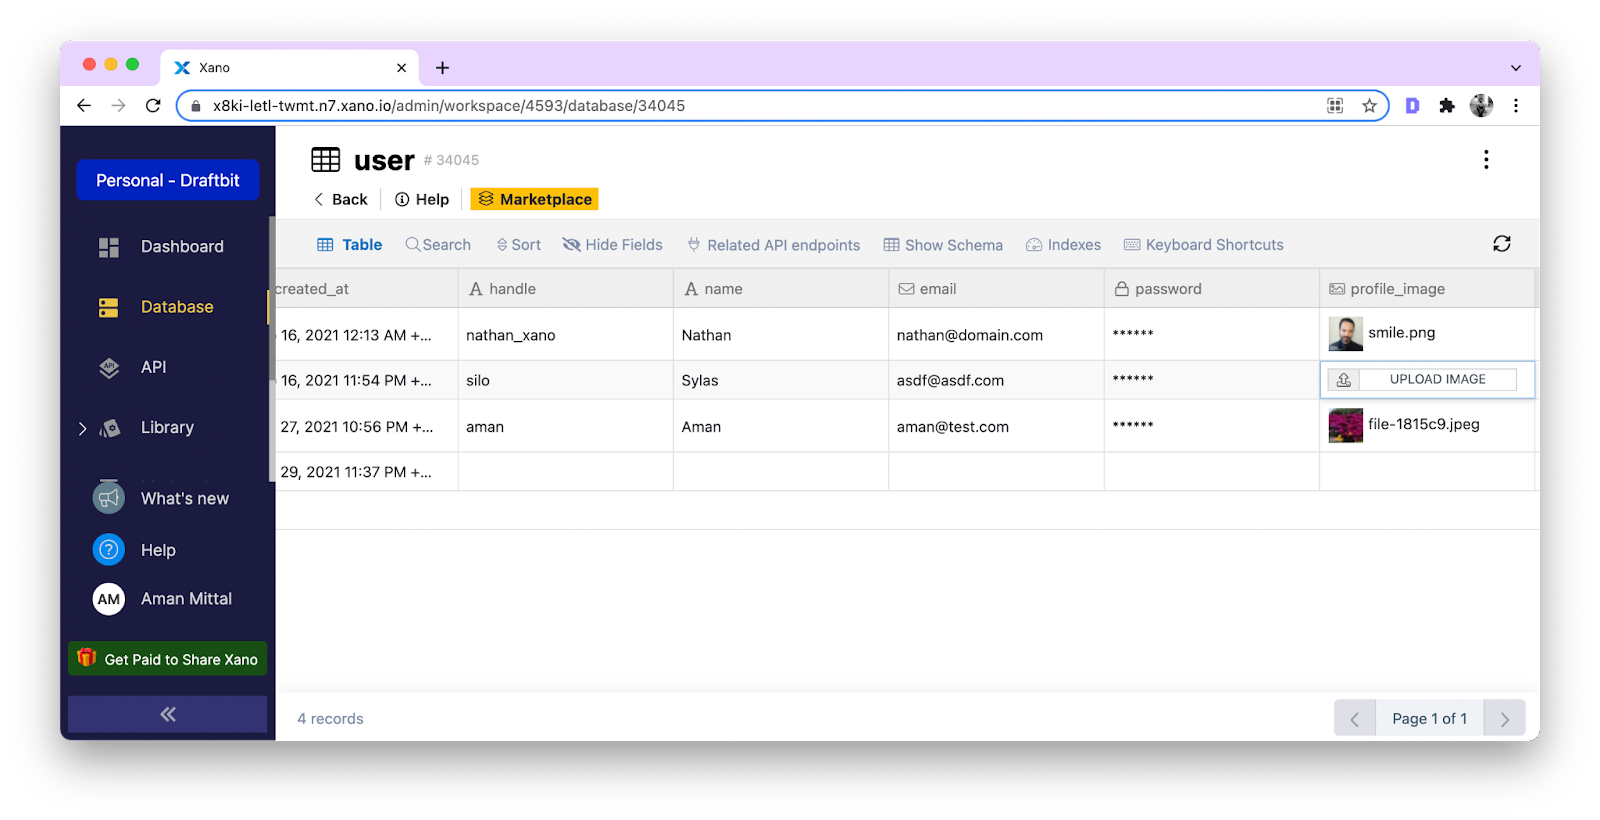
Xano as a backend offers different field types. One of these types is image. The first type of image upload from the Draftbit app is to upload a user’s profile image. Xano’s photo-sharing already provides this image field type in the user database table under the field name profile_image.
You need to create an endpoint to upload an image from the Draftbit app. Currently, the Draftbit builder interface provides an action to directly upload a photo and chain it with the API request action to send the request to Xano’s backend. The image is sent in base64 format. Xano supports this format.
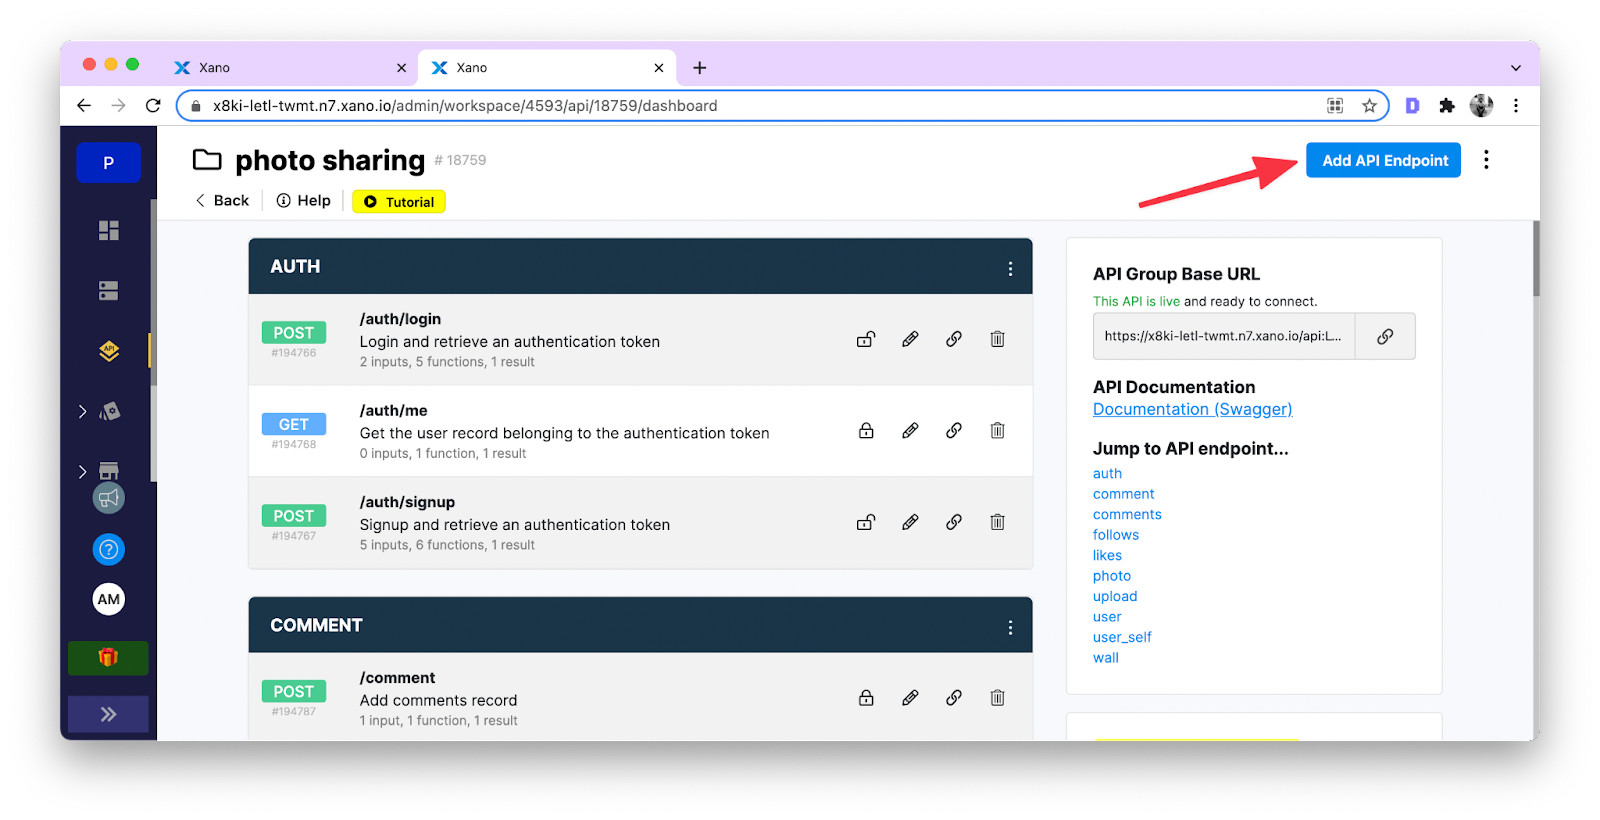
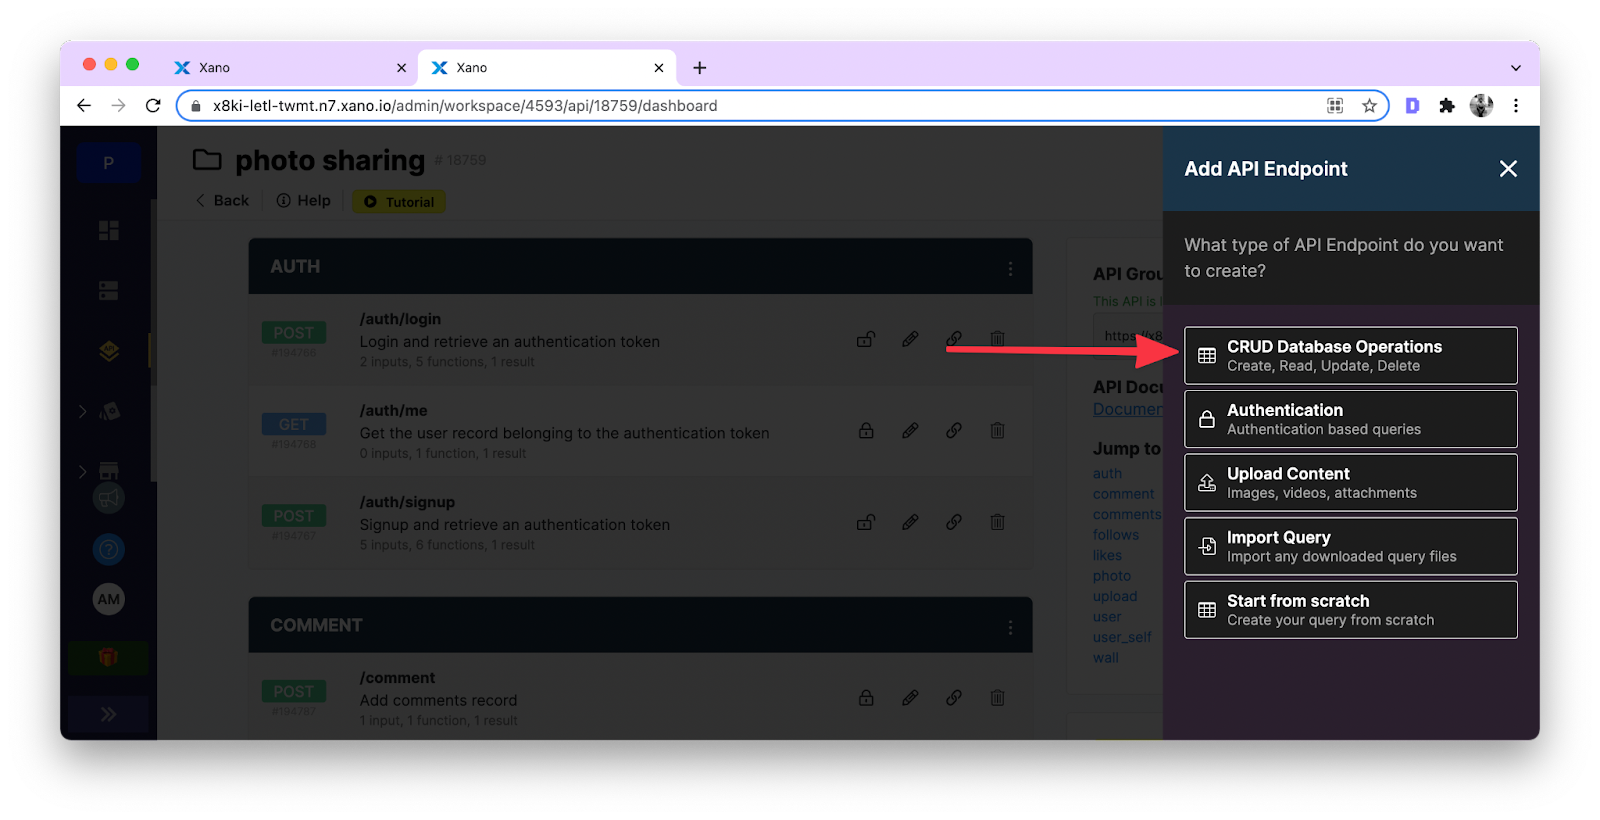
To create the endpoint, go to Xano’s API group for the photo-sharing app and click Add API Endpoint button. Then select CRUD Database Operations, select the user table, and select the EDIT operation.


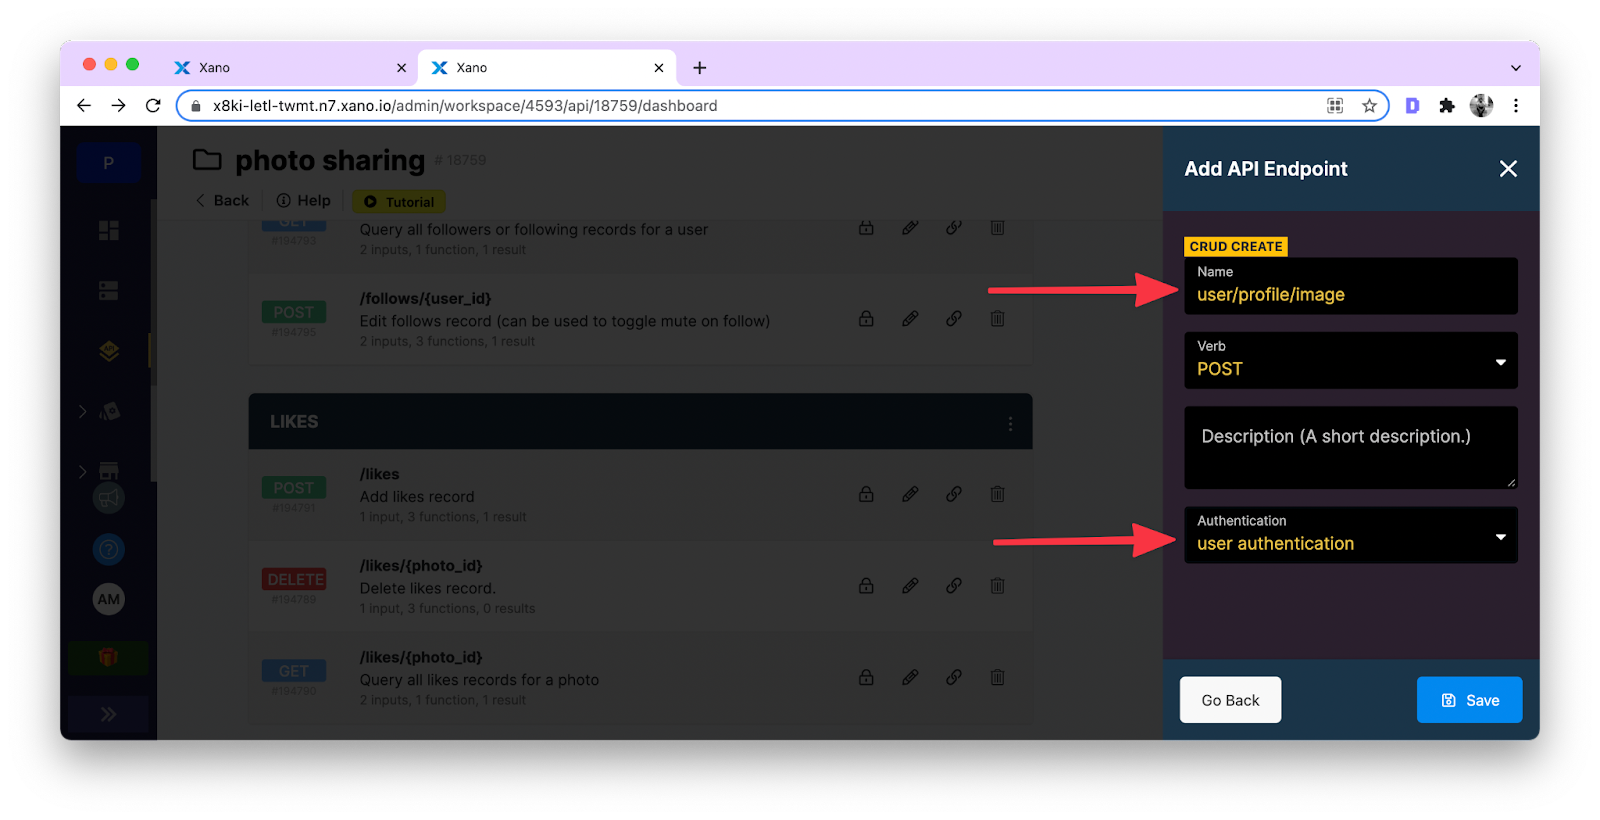
Next, enter the endpoint’s name to be user/profile/image/. This is the actual endpoint name you create, so make sure it is unique among all other endpoints in your Xano API group.
Under Authentication, select user authentication and click save. This way, only the logged-in user can upload their profile image. Xano and Draftbit both will use the auth token generated when a user logs into the app.
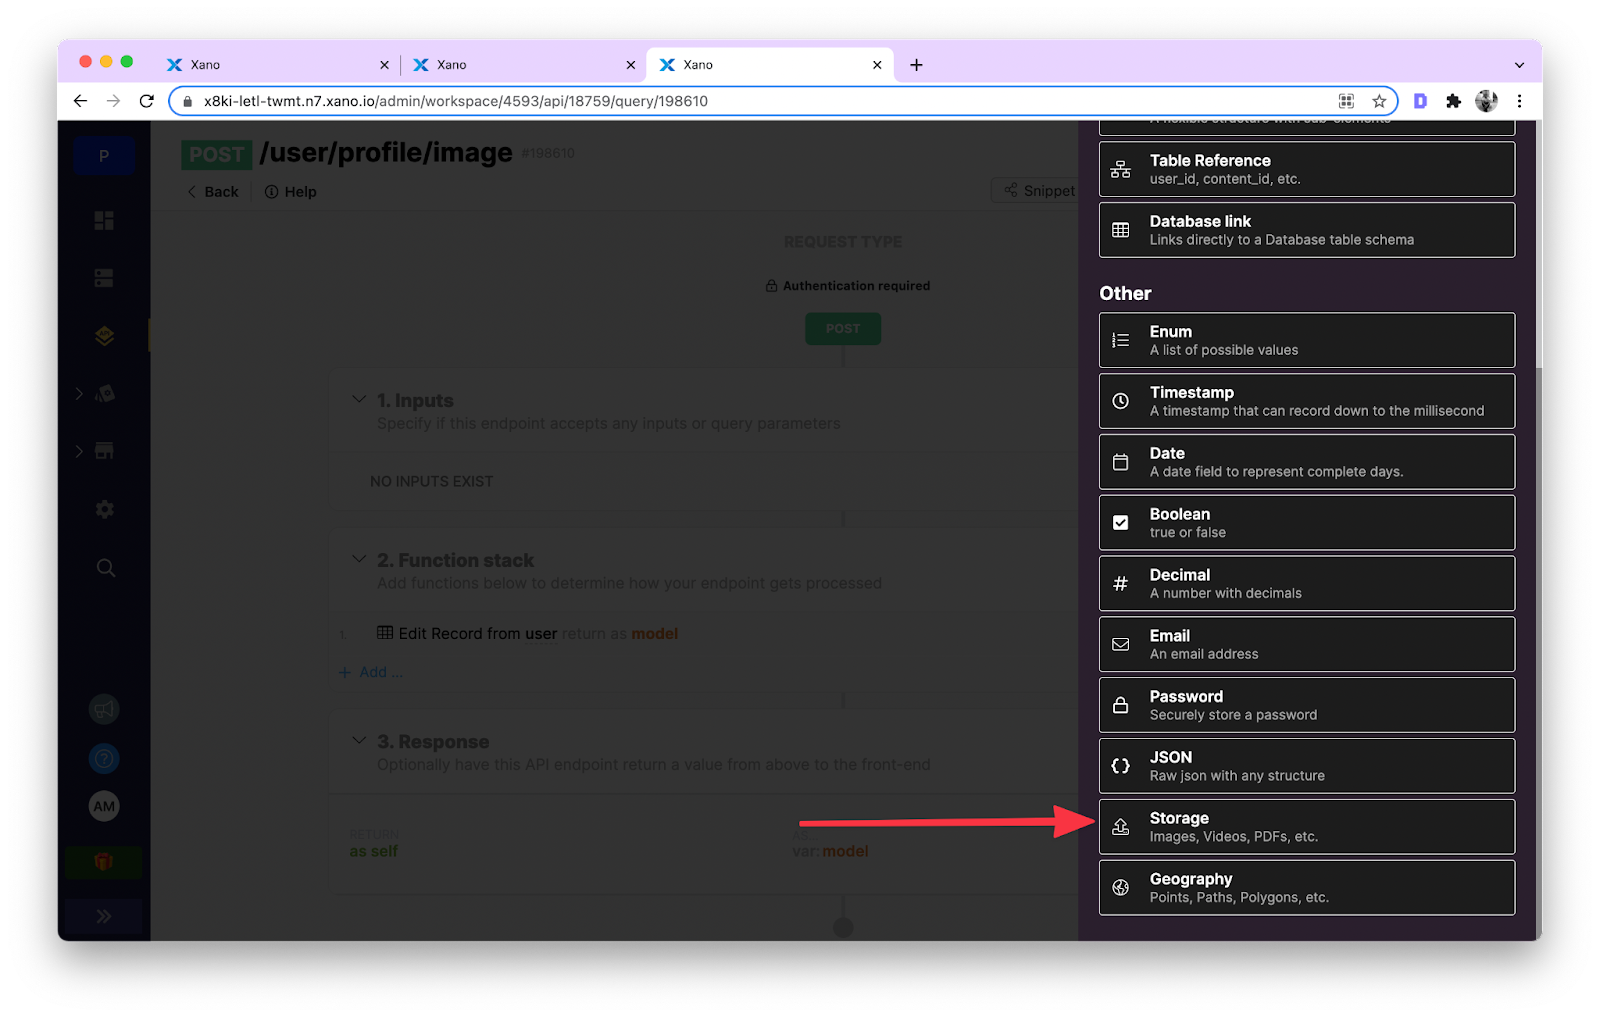
Let’s edit this endpoint. The only input required for this endpoint is content. Click the + button next to Inputs, then select storage as the field type.
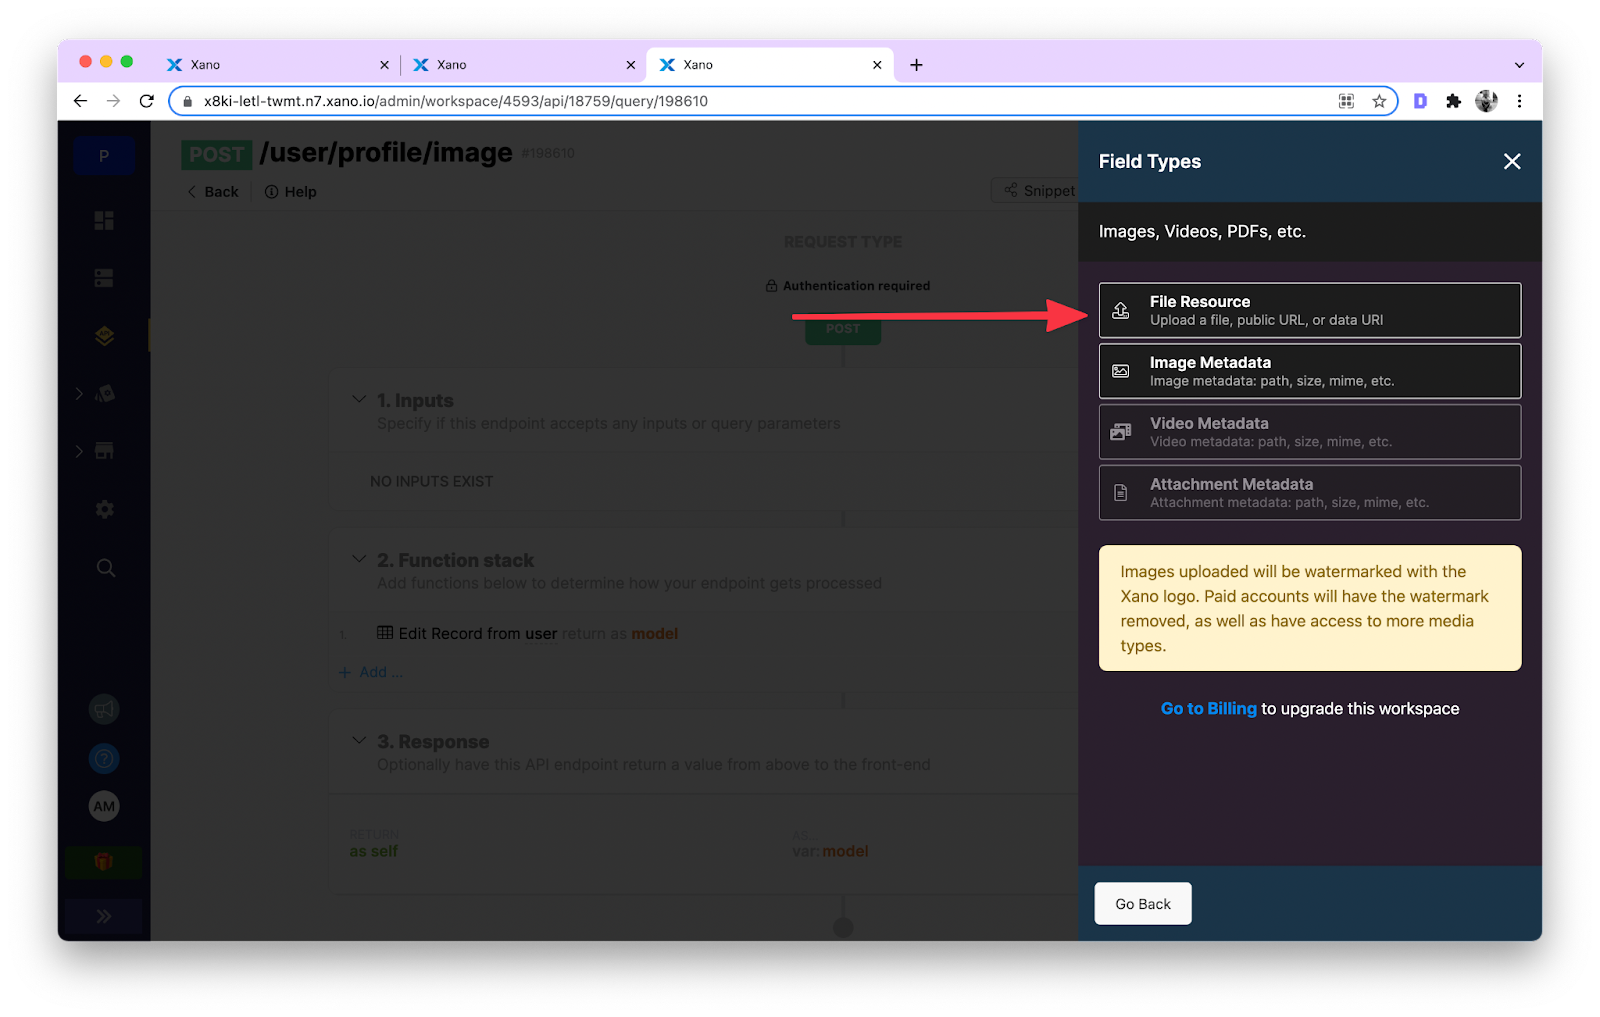
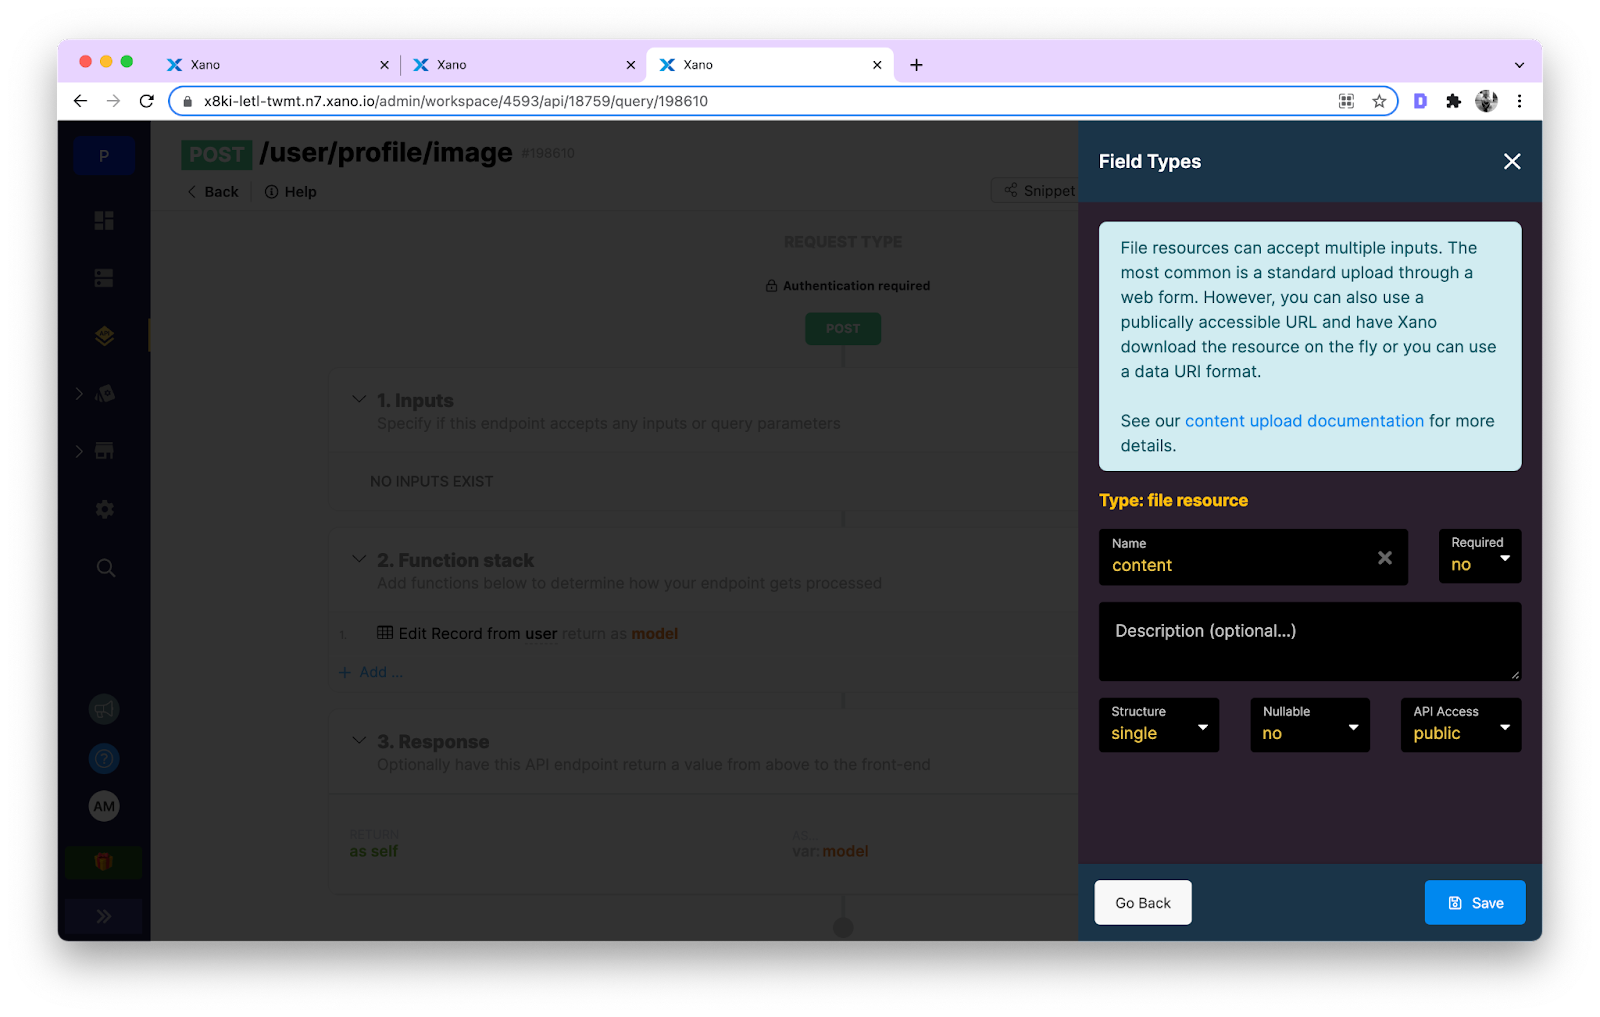
Under storage, select the type to be File Resource and enter the name of this type to be content. Then, click Save.
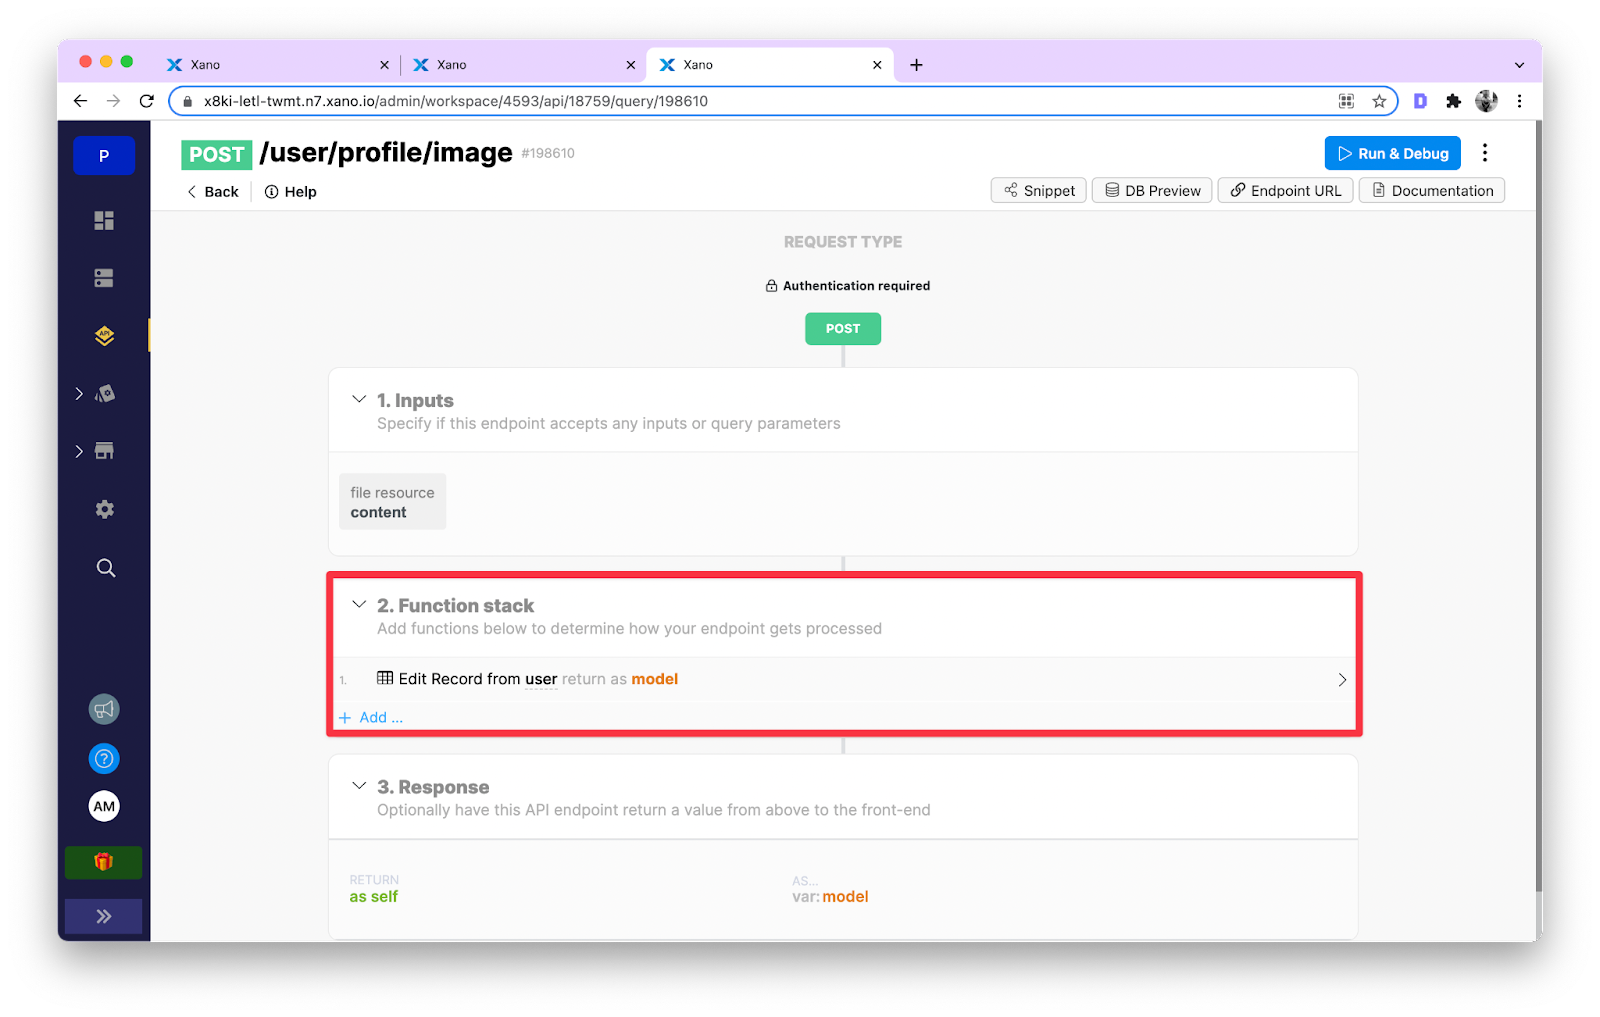
To edit the authenticated user’s record in the Xano database table, the content value has to be mapped to a variable name. This is done under Function Stacks.
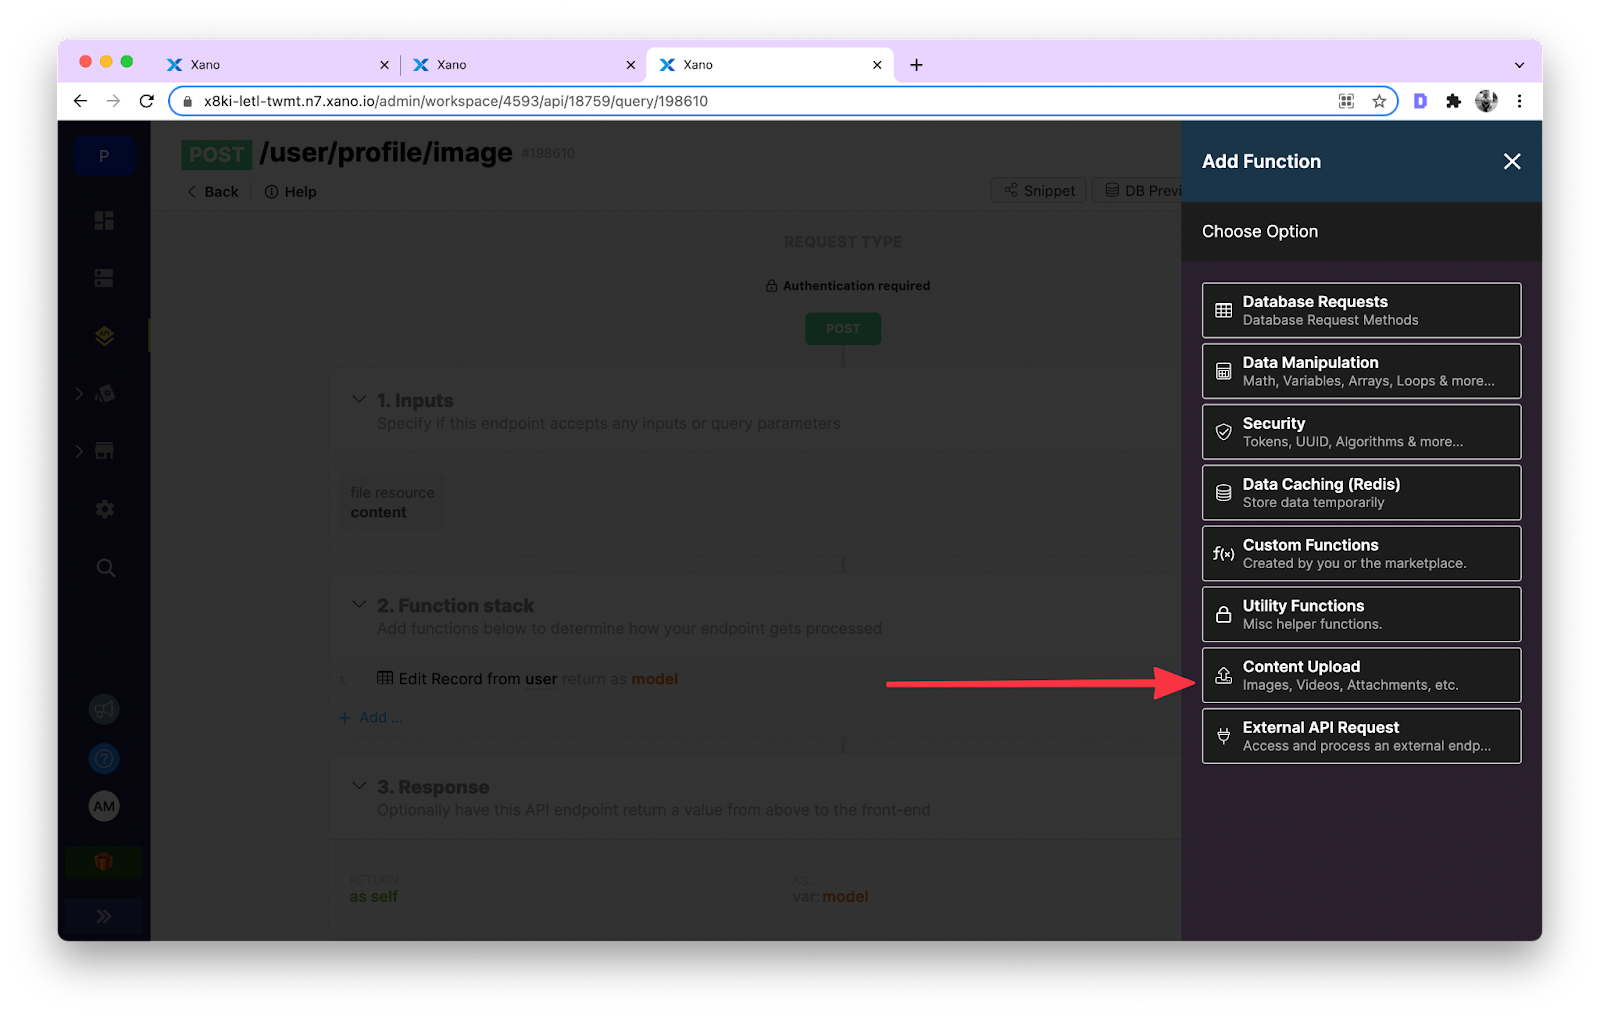
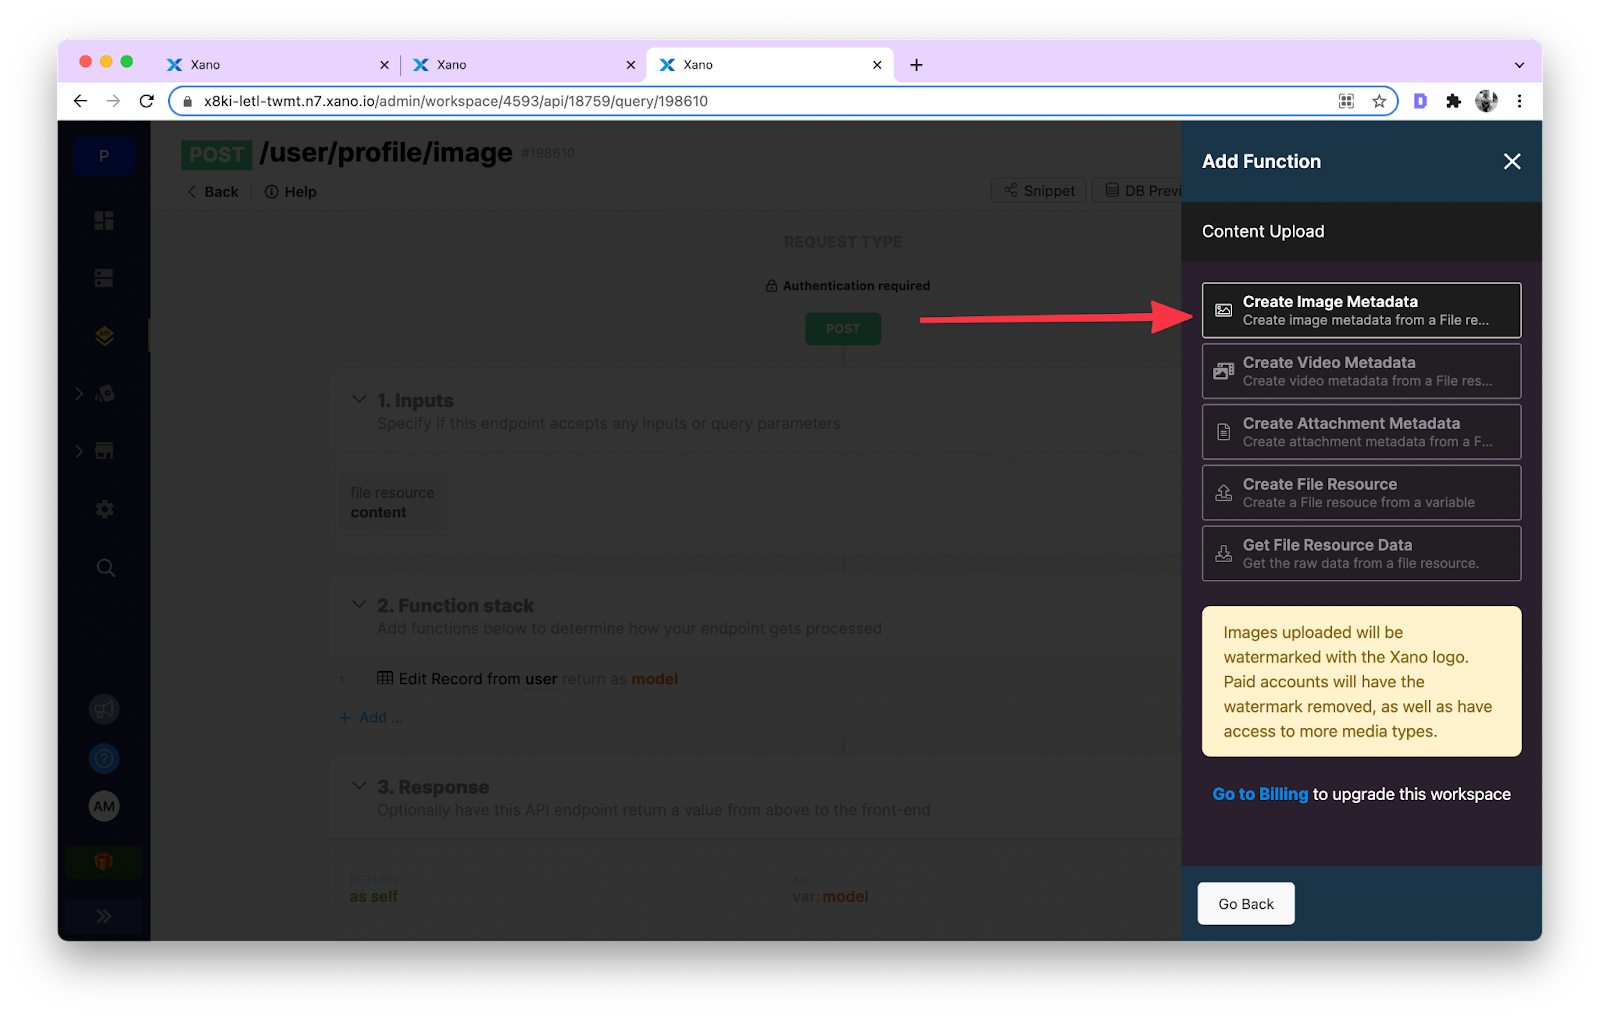
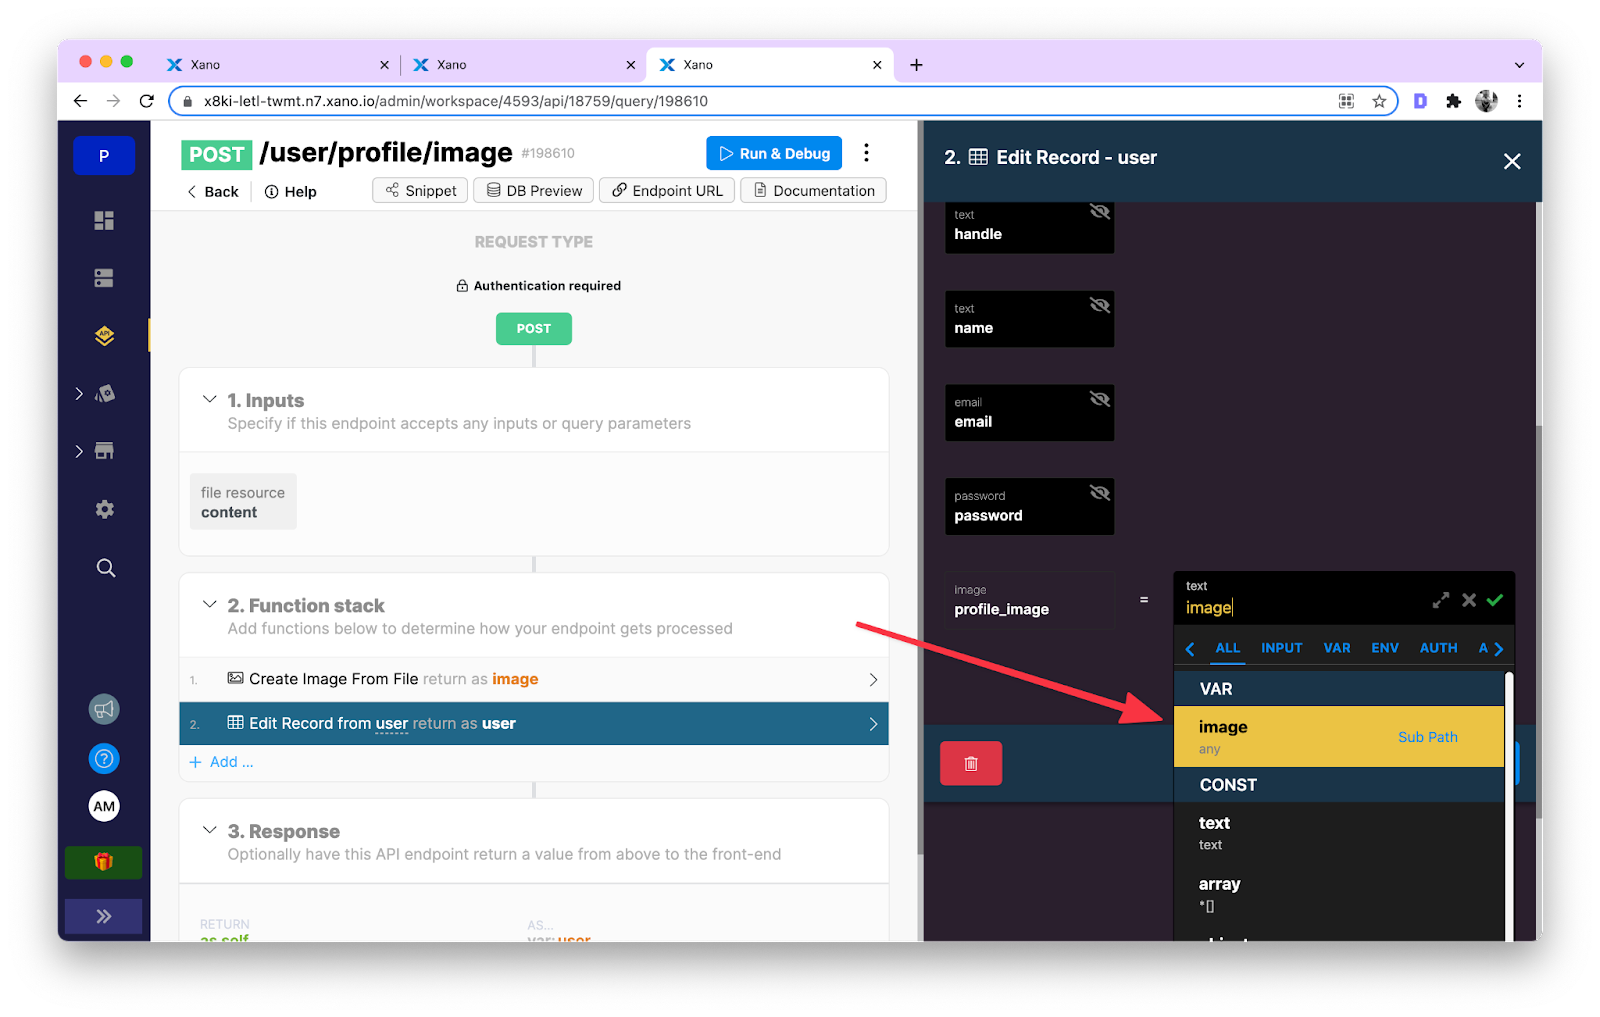
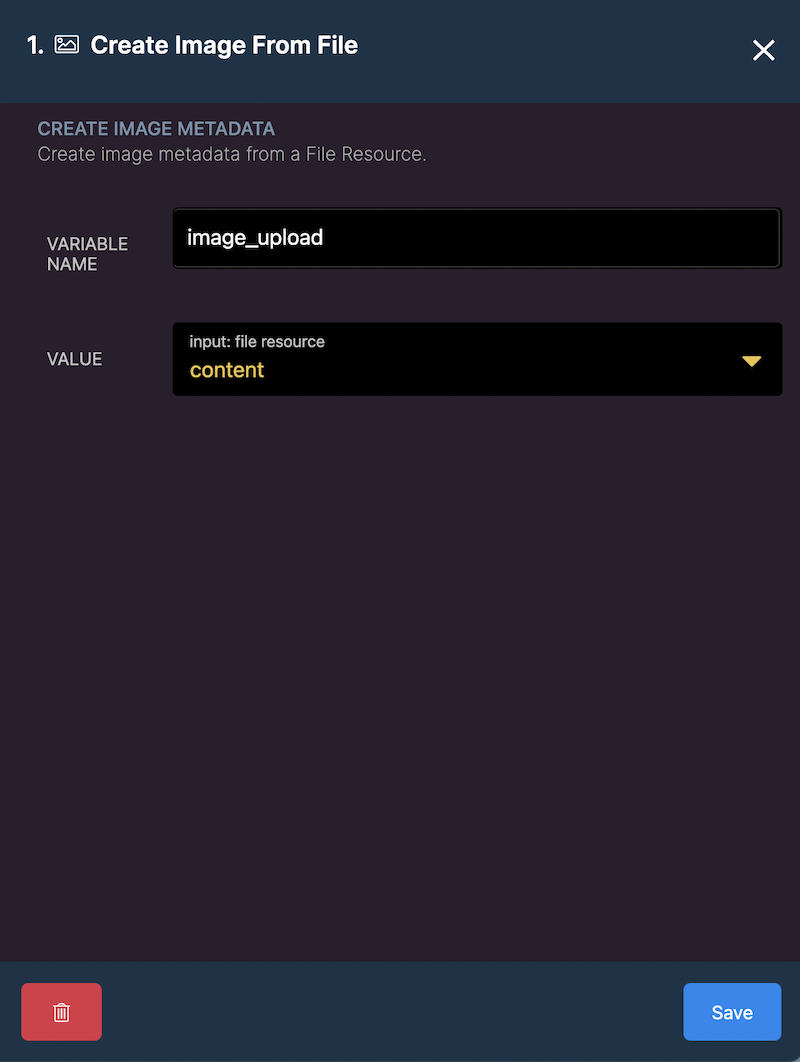
Click the + button, select the Content Upload option and then select Create Image Metadata.
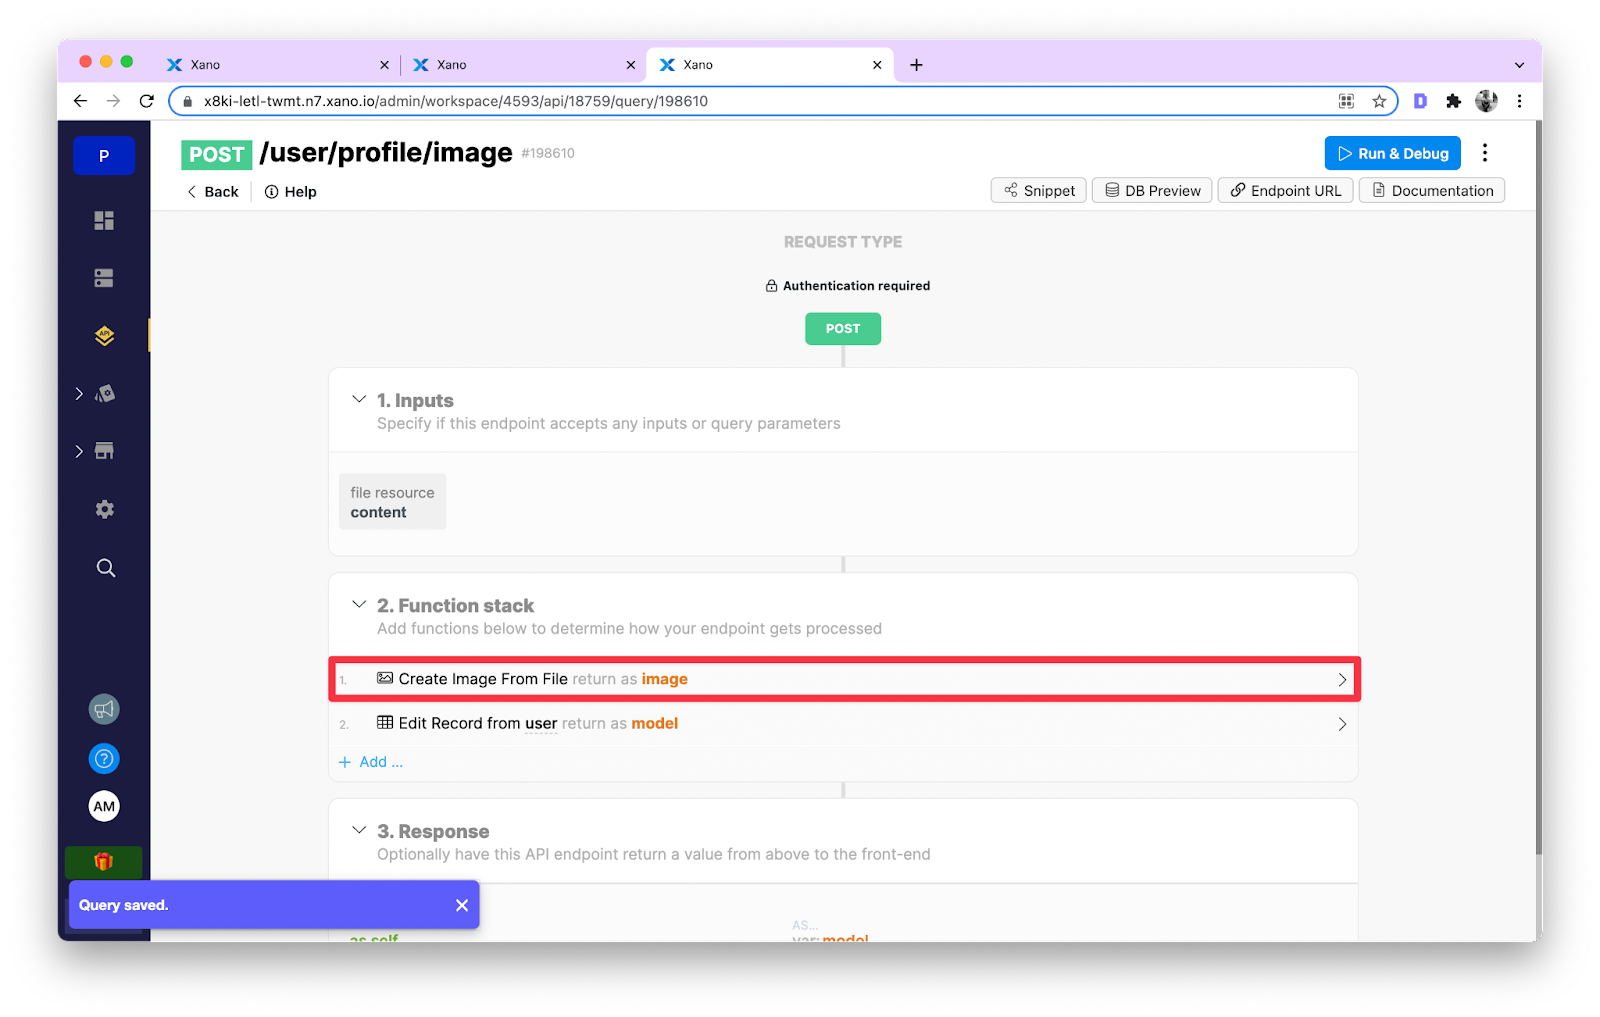
This will open another popup where you will assign the variable name. For example, the variable assigned below is called image, and its value selected from the dropdown is content.

Click save and make sure this function is the first in order to run.
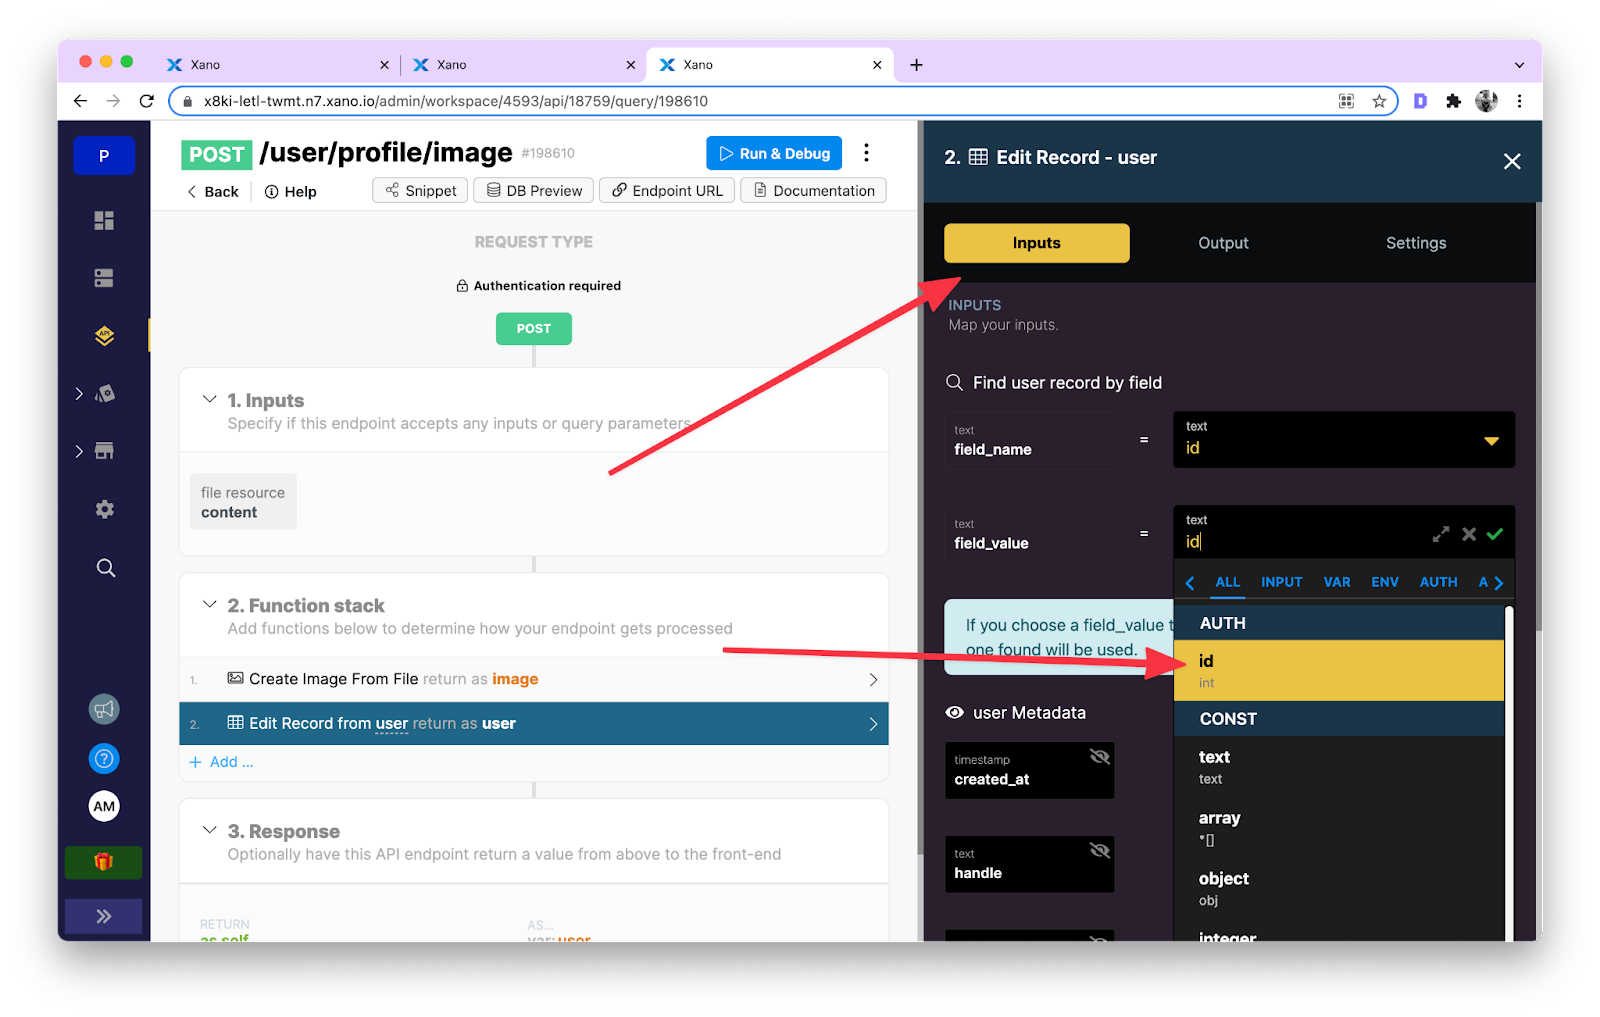
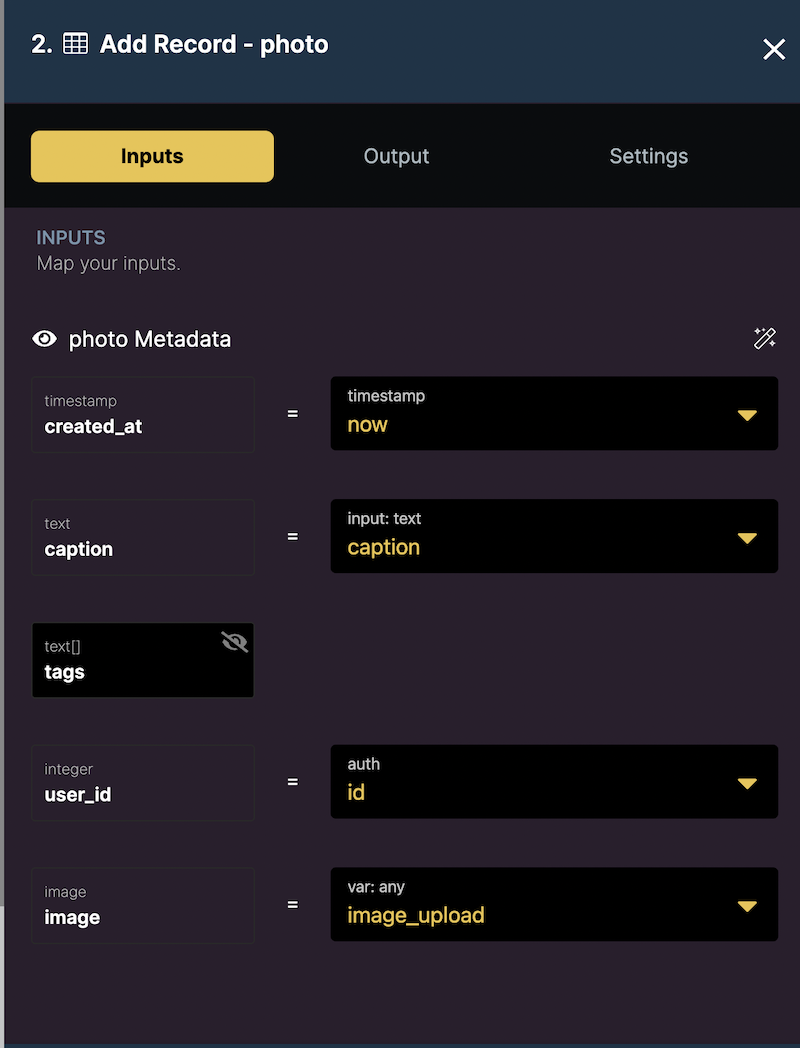
Select the next function in the stack to modify it. Under Inputs, set the value field_value to id from the dropdown. This id here represents the authenticated user’s id.
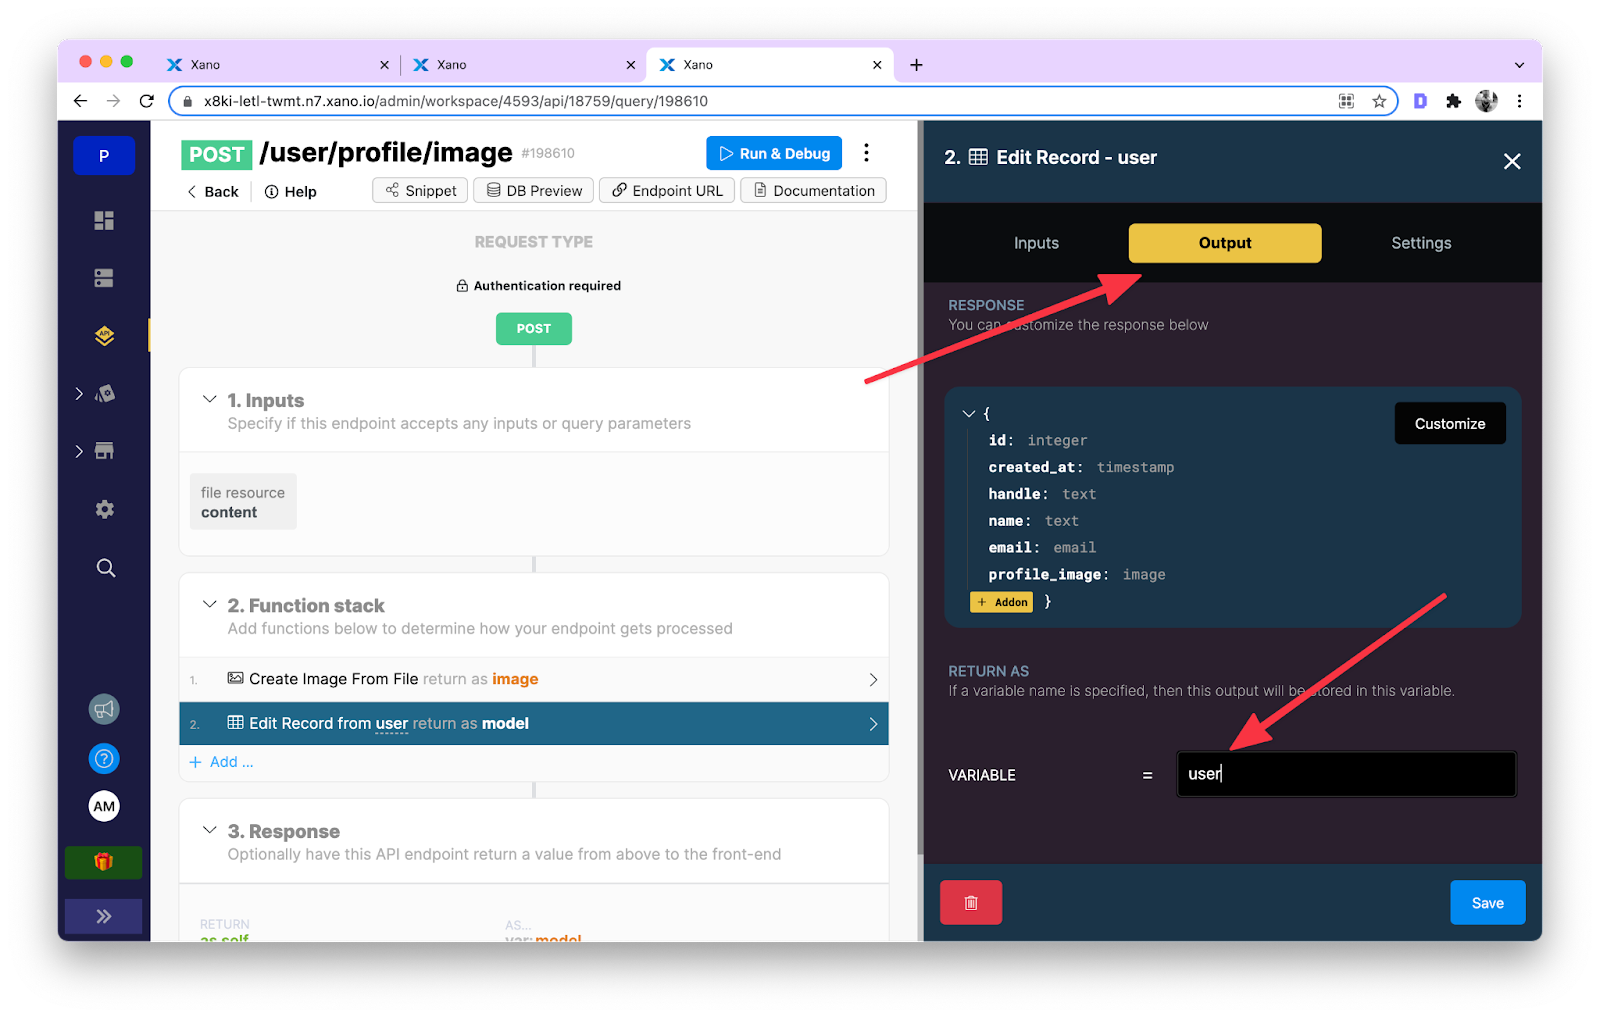
Then, hide all the field types under user Metadata except profile_image since you only need to modify the value of this field from the endpoint.
From the dropdown menu, select the input type to image as the value of profile_image.
Also, in the same popup, go to the second tab called Outputs and change the value of VARIABLE to user since we want to return the user object.
In Response, modify it by selecting user from the dropdown menu and clicking Save.
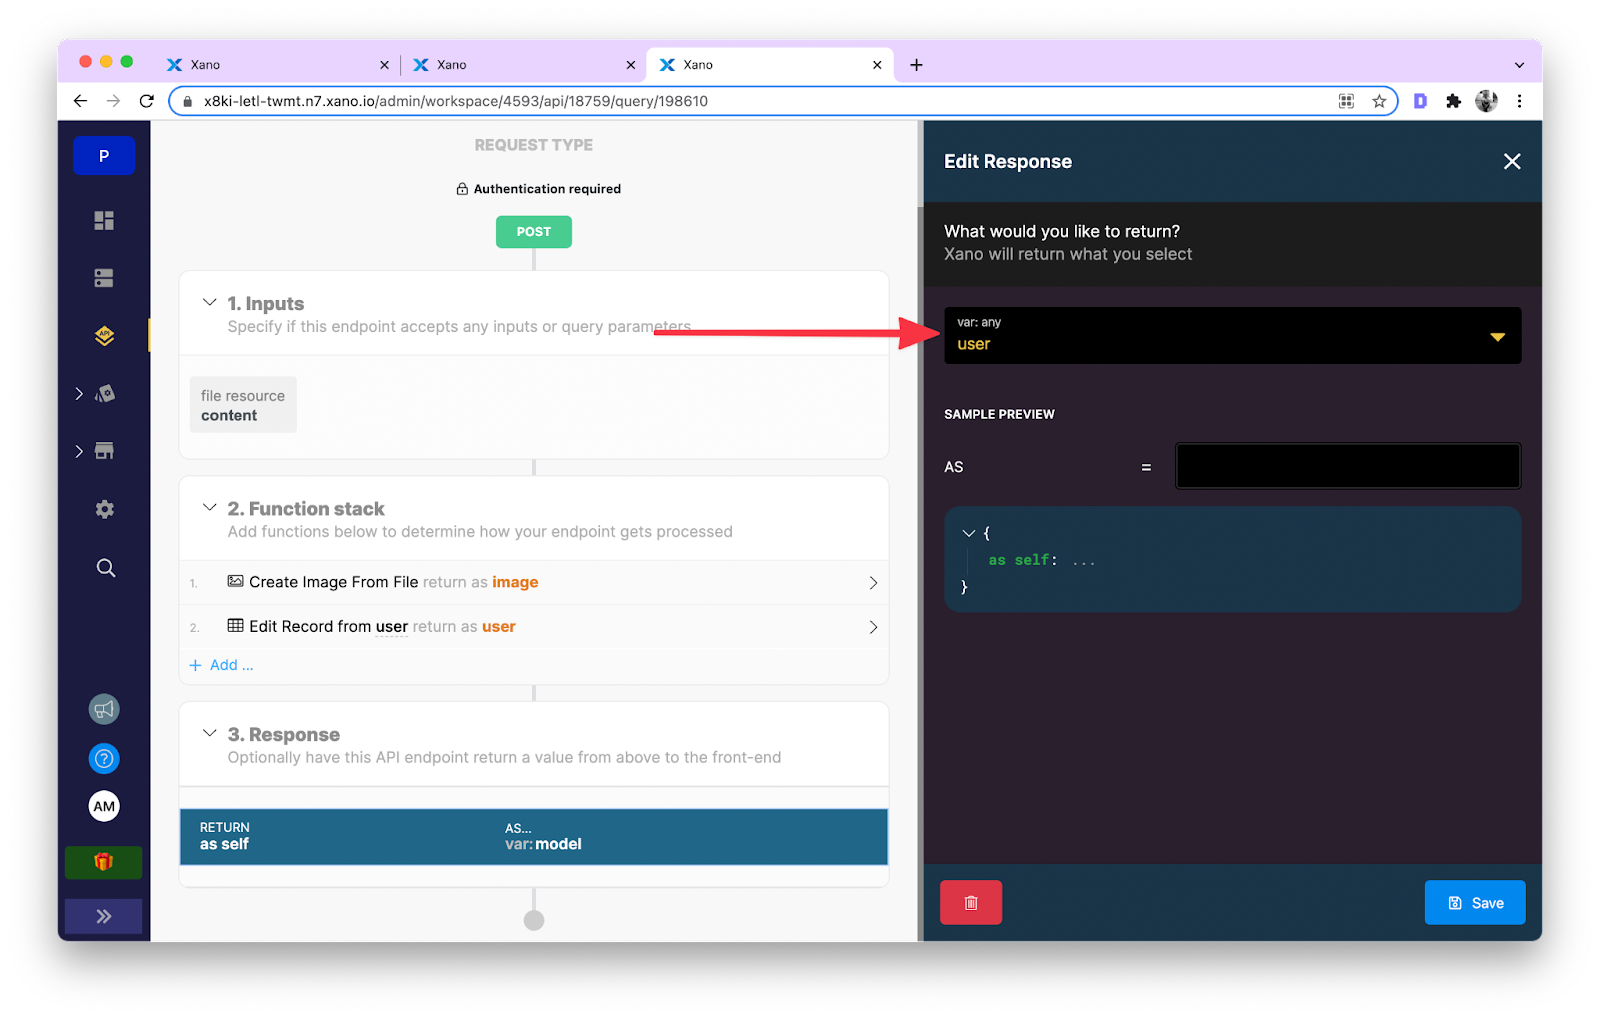
That’s it to create the endpoint.
How to add an endpoint in Draftbit to upload a user’s profile image
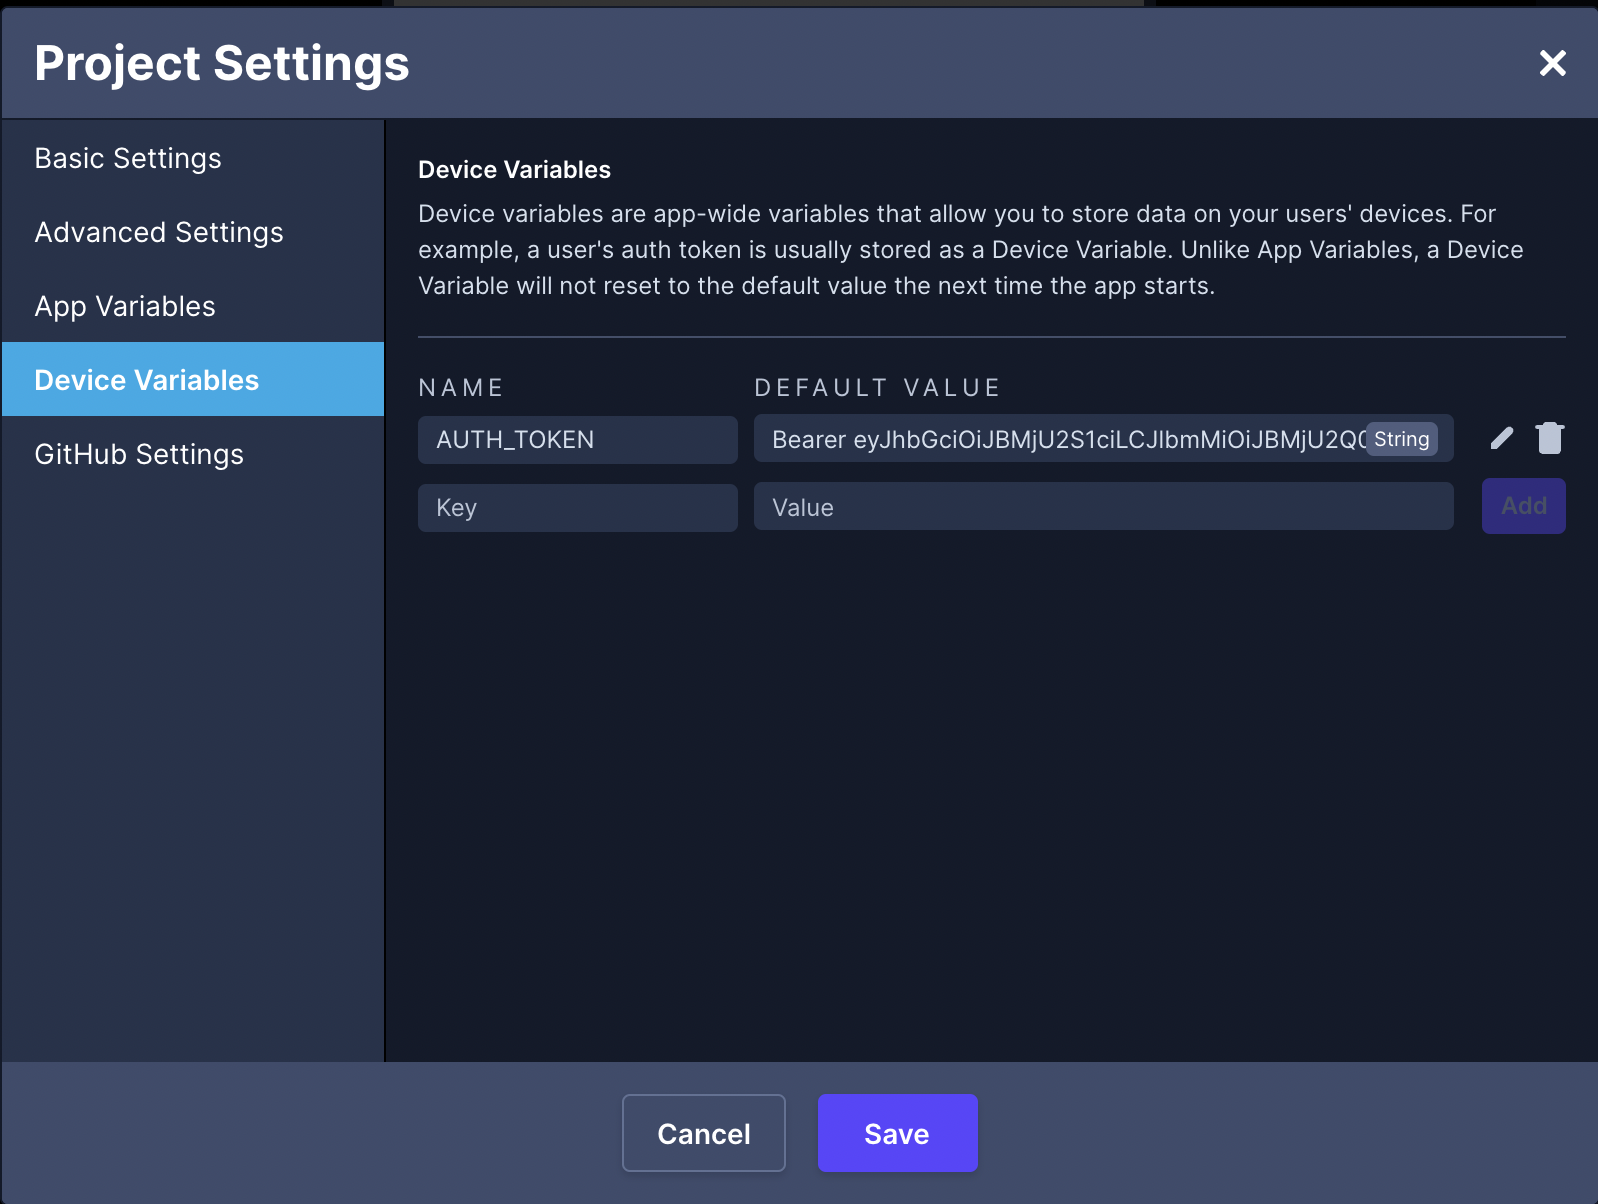
To test the endpoint in Draftbit, you will require two things. The first is an auth token of a user already created in Xano. It is saved in Project Settings > Device Variable with a key such as AUTH_TOKEN.
The second thing required is dummy image data in base64 format. To test the endpoint, we’ll use a placeholder image encoded in base64 format from this source. This will be passed as the body of the request.
Start by adding an endpoint in Draftbit. Enter its name, select its Method to be POST since the API request sent to Xano is of that HTTP method. Next, set the Role to Update and set the Object type to authuser. Draftbit, behind the scenes, uses react-query for querying and mutating data to an API service.
The Body configuration is a JSON object with a key as content, and its value is an image in base64 format.
{
“content”: {{profileImage}}
}
Also, in Headers make sure to add the Authorization header and set its value to auth token saved as Device Variable.
Testing the endpoint on success will return the user object from the Xano database. It will also have a field name called profile_image, which we’ll be using in the next section.
Note: Make sure to remove the hard-coded value of auth token from Device Variables after you have tested and verified the endpoint in Draftbit.
How to upload a profile image in Draftbit using the image picker action
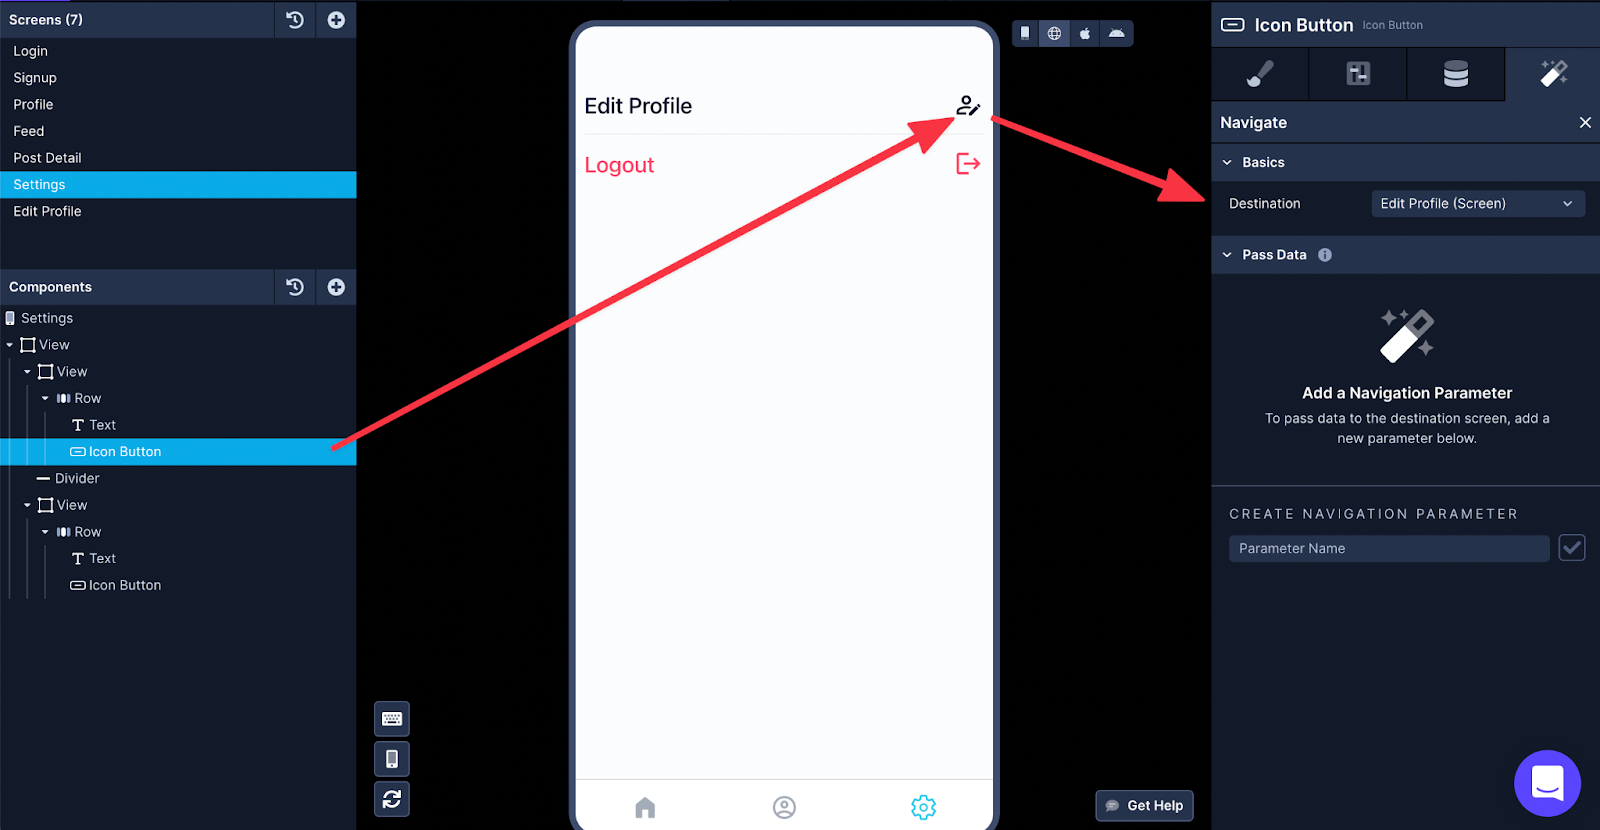
To implement image uploading in a Draftbit app, we will create two screens. The first screen is called Settings that have an Icon Button component. This button component is to navigate the user within the app to another screen called “Edit Profile”, where they can upload a profile image.
Add a Navigate action on the Icon Button component and set the value of Destination to Edit Profile.
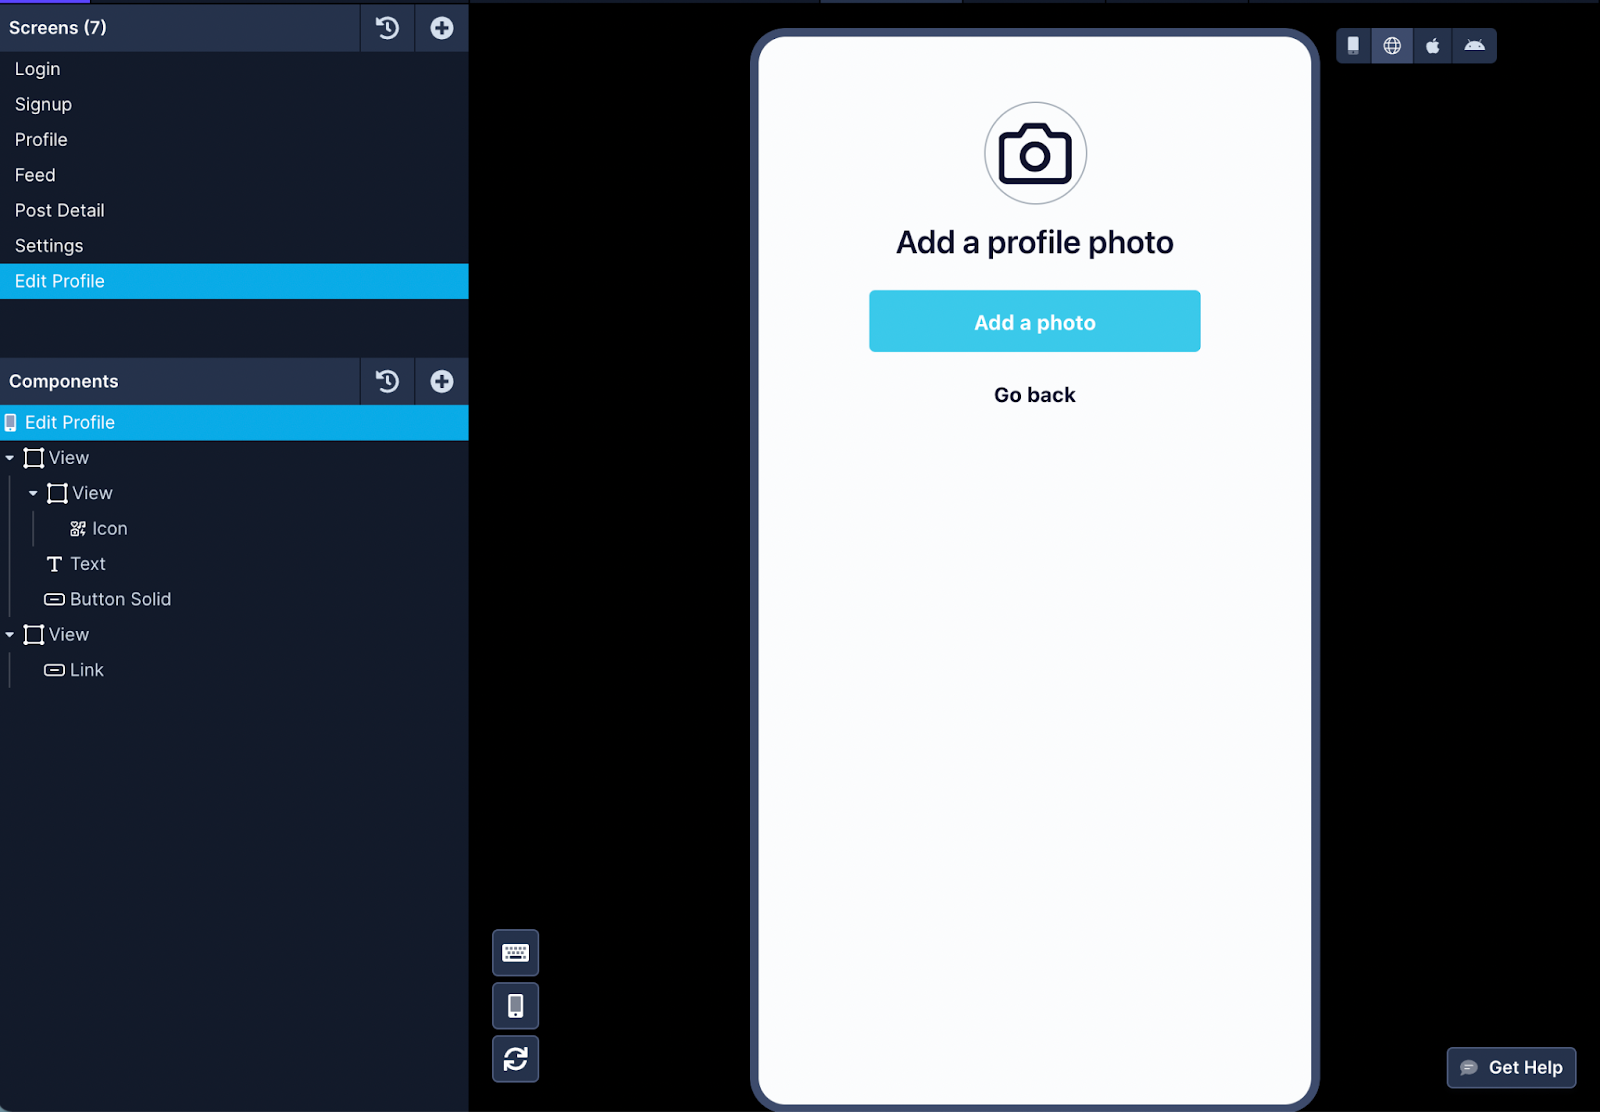
The Edit Profile screen contains an Icon, a Text, and two Button components. The first Button component will trigger a chain of actions to select an image from the device’s media library, upload an image to Xano and navigate back to the Profile screen.
The second button is a borderless button that allows navigating back to the Profile screen. It has only one action associated.
Select the solid background Button component, and go to Interactions (last tab) in the Properties panel on the right-hand side.
Add the following actions:
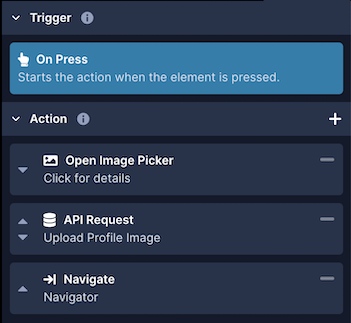
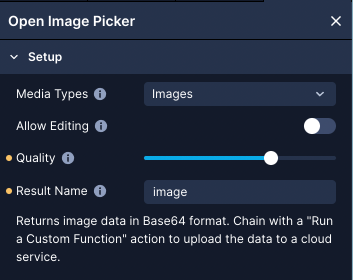
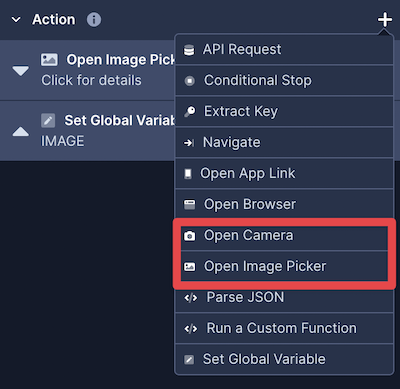
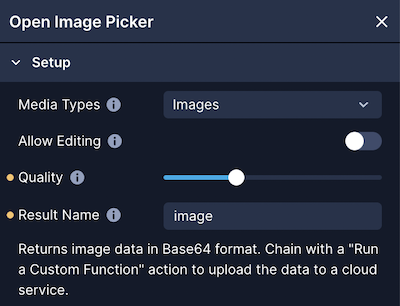
Add the following action called “Open Image Picker”. Set the Media type to Images from the drop-down menu. You can set the image’s compression quality to be uploaded or enable Allow Editing to let the user crop the image before uploading.
Make sure to set the Result Name to image. This will be used in the following action.
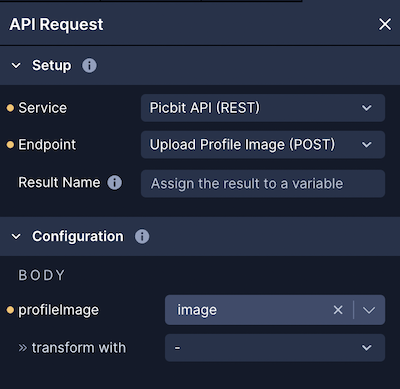
Add “API Request” action. Set the name of Service and Endpoint. In Body, select the result name image of the previous action. This will map the value of the last action’s result to the request’s body variable defined when creating the endpoint.
Chain the “Navigate” action to navigate back to the Profile screen once the image is uploaded.
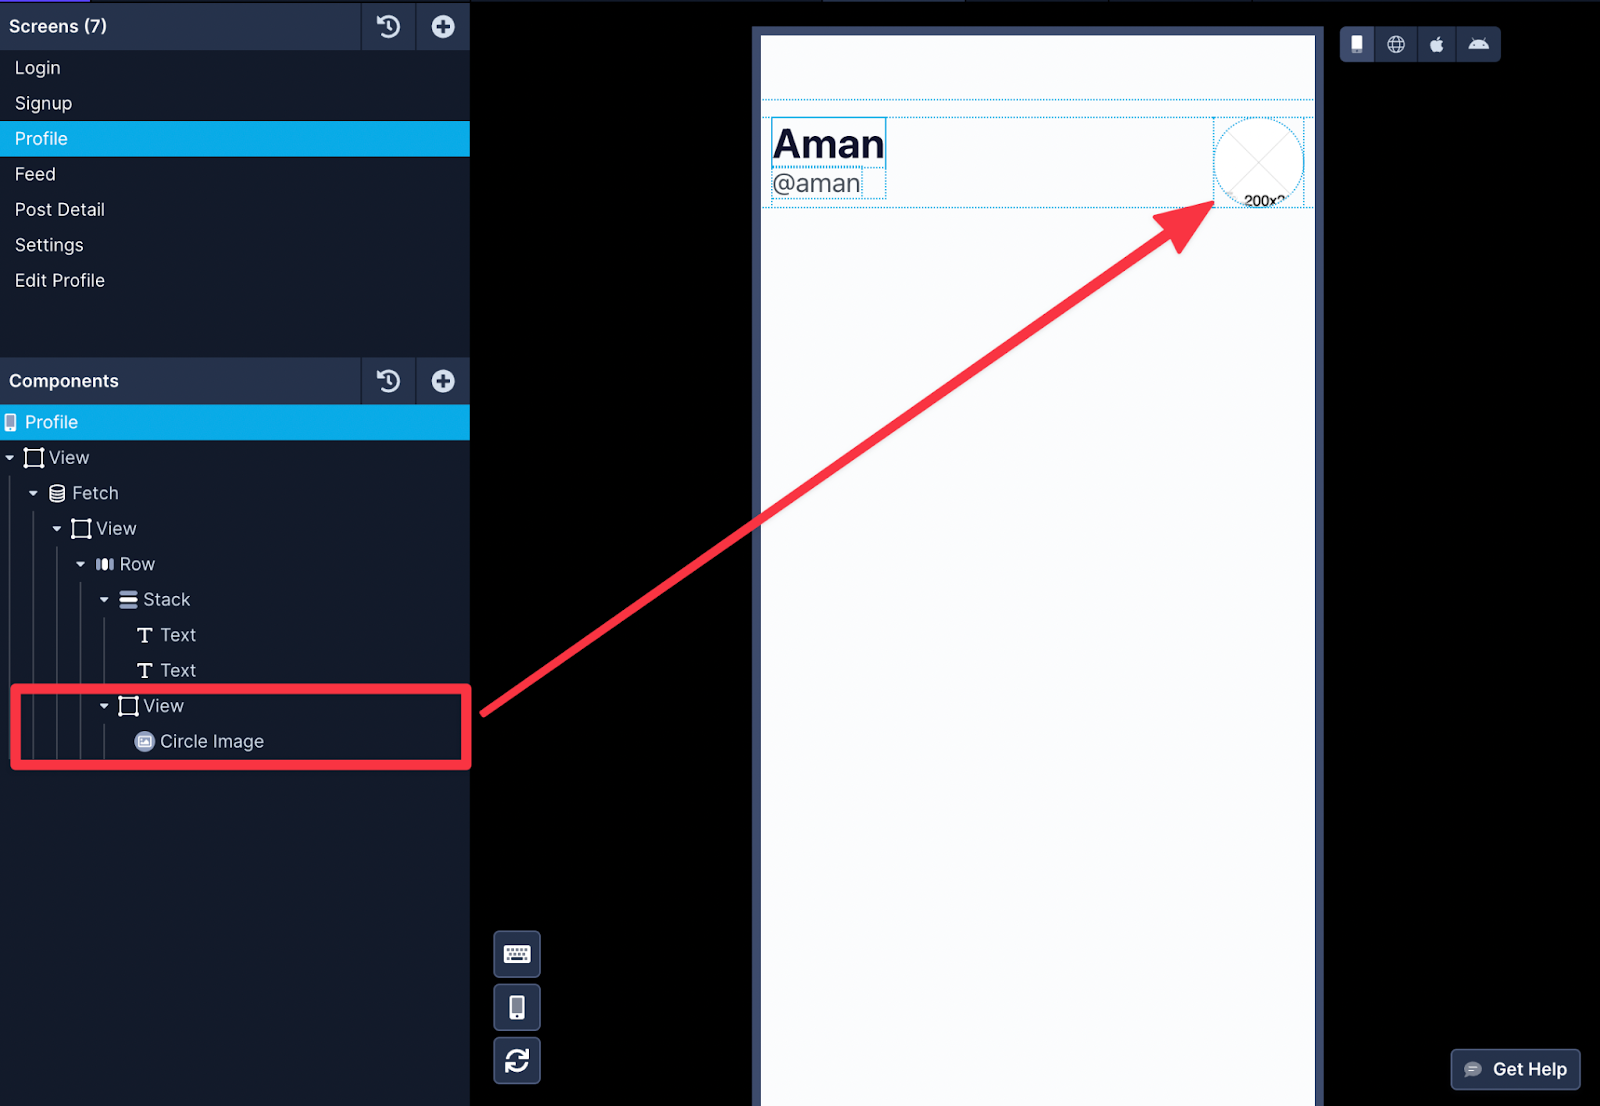
In the “Profile” screen, you can add a Circle Image component to display a user’s profile image.
Here is the complete working example of uploading a profile image to Xano and then displaying it in the Draftbit app’s Profile screen:
How to upload images to Xano’s database table with a caption to create posts like Instagram
In Xano, you’ve already seen the process of uploading an image. A separate API sub-group is available in the Photo-sharing API to upload and create a post with a caption, a timestamp, and the user who made that post.
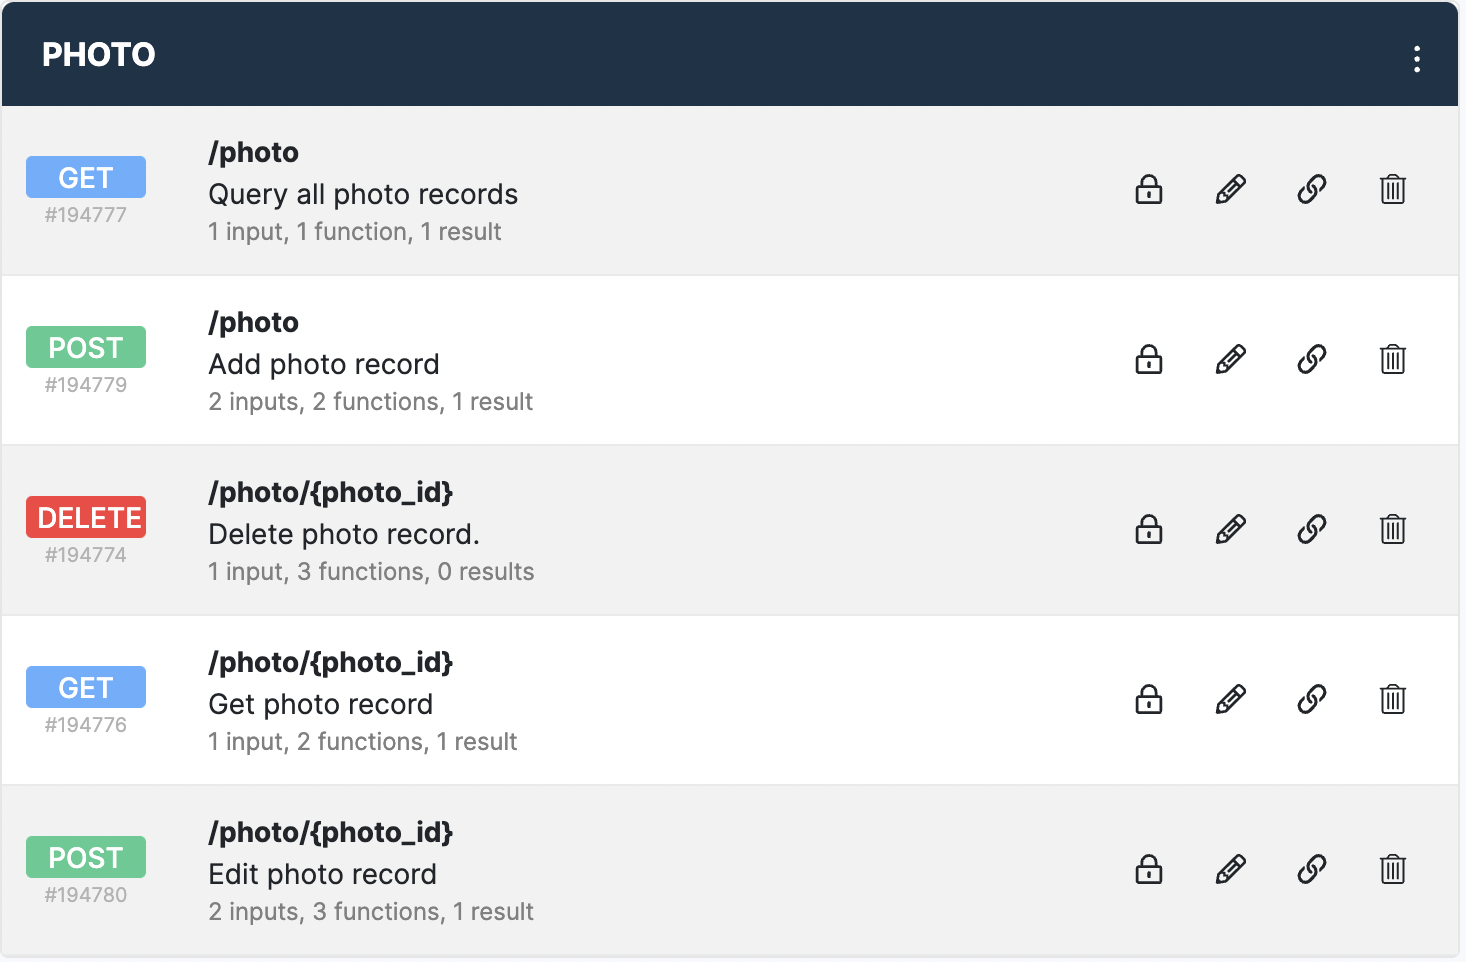
From the above, to create a post like in an Instagram app, the /photo endpoint is used. It accepts input parameters but the most important ones are caption and content. By default, this Xano endpoint does not have content available as an accepted input parameter. Therefore, you will have to add it (like before when uploading a user’s profile image). Also, since you add content as a new input parameter, you must map it to the image field in the photo database table.
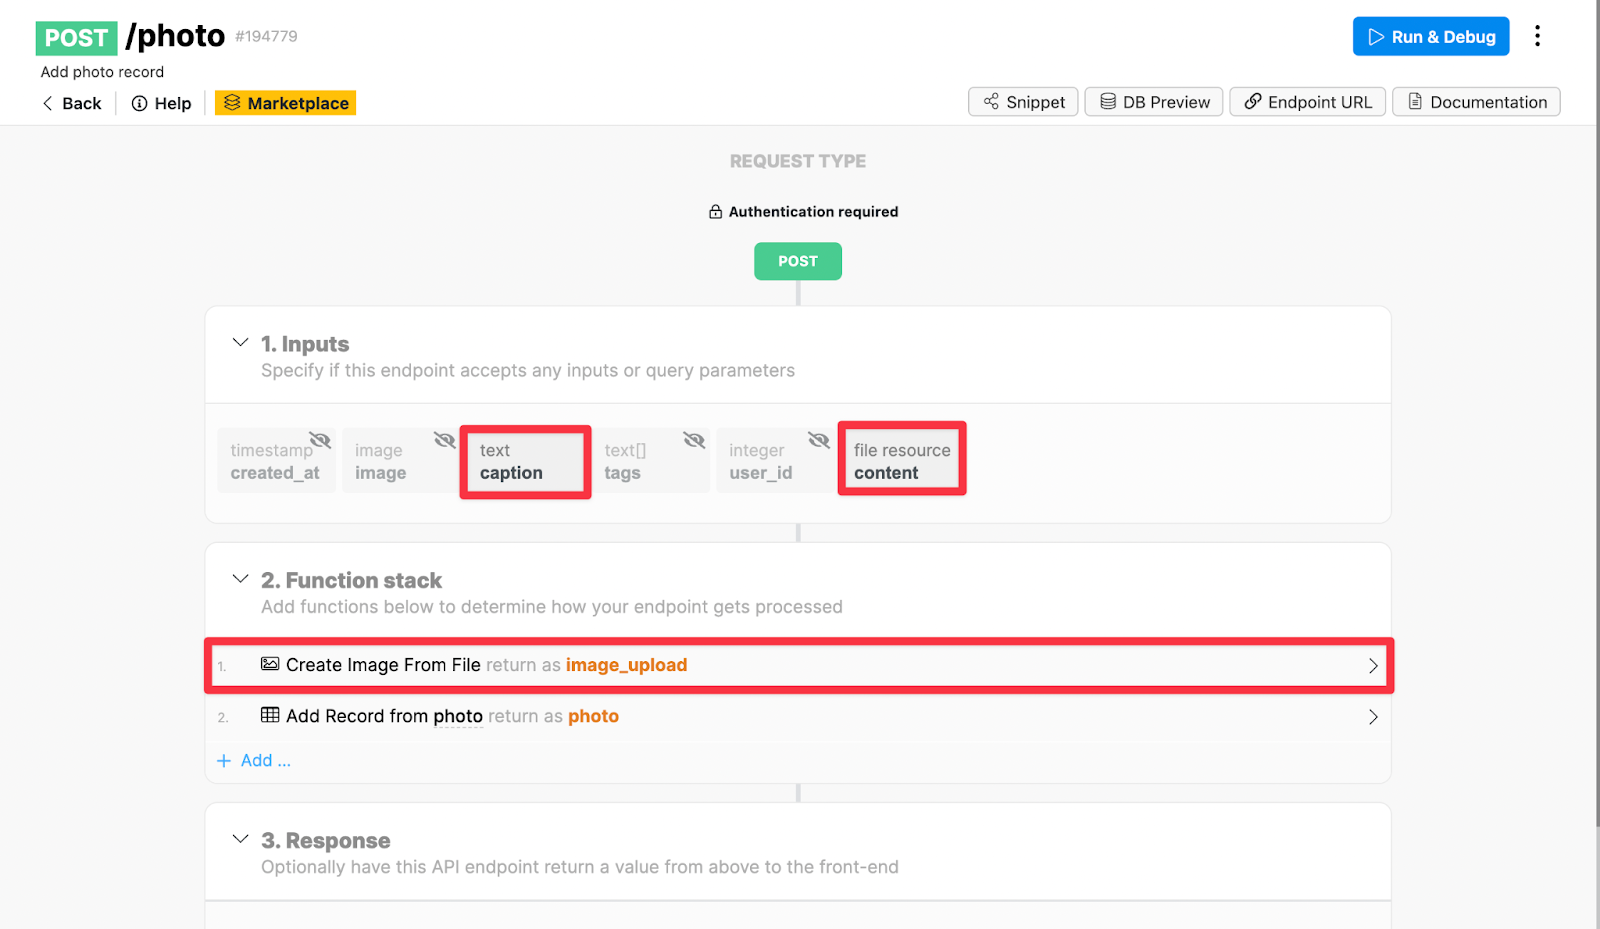
In the above image, please take note that we’ve hidden the tags input parameter for now.
After modifying the endpoint in Xano, let’s go to the Draftbit app and create this endpoint.
- In Step 1: add the name of the endpoint and. Set the Method to POST. Select a role Create from the dropdown menu since this endpoint will create a new post. Also, add an Object Type such as photos, to allow Draftbit to cache the data from this endpoint under the hood.
- In Step 2: add the /photo parameter.
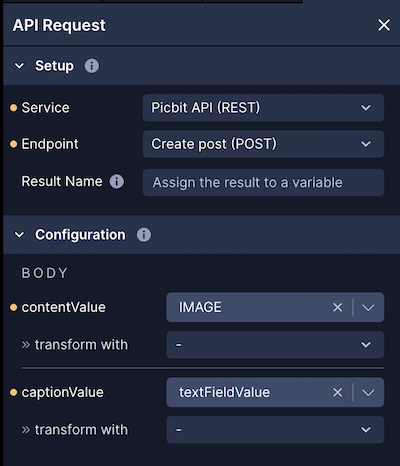
- In Step 3: add the following body configuration.
{
“caption”: {{captionValue}},
“content”: {{contentValue}}
}
The key name in the request’s body caption and content are the same input parameters that Xano accepts. For the value of content, add a placeholder image data in base64 format. For example, you can generate one from here.
- In Step 4: add the Authorization header and select the Device Variable for auth token. To test this endpoint successfully, you will have to ensure that the auth token contains the actual auth token value with the Bearer prefix.
- In step 5: click Test to test and verify if the endpoint is working correctly.
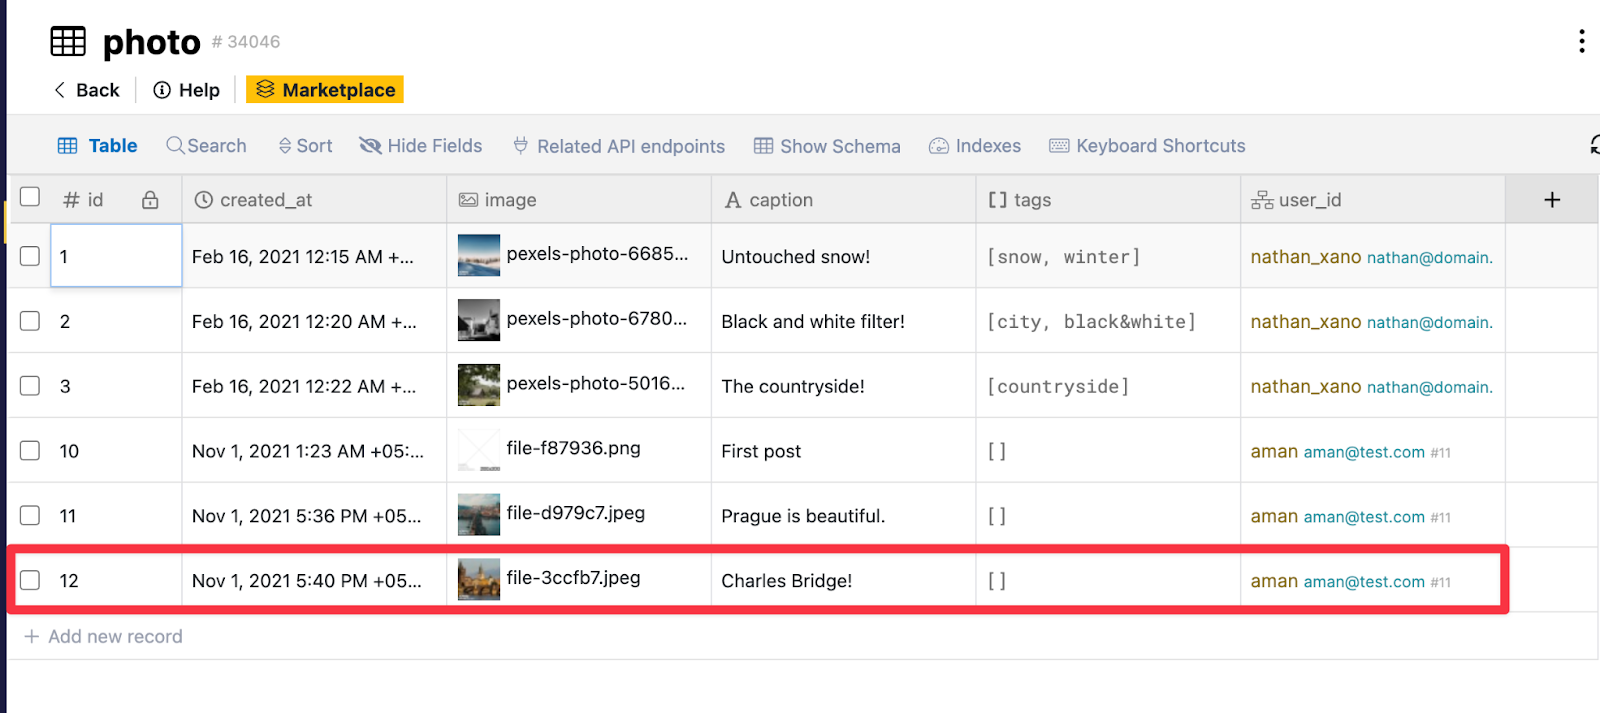
The endpoint will create a new record on success in your Xano’s photo database table, as shown in the image below. Also, take a look at the user id associated with each record. Xano is handling that for you.
![]()
How to add a Create Post screen
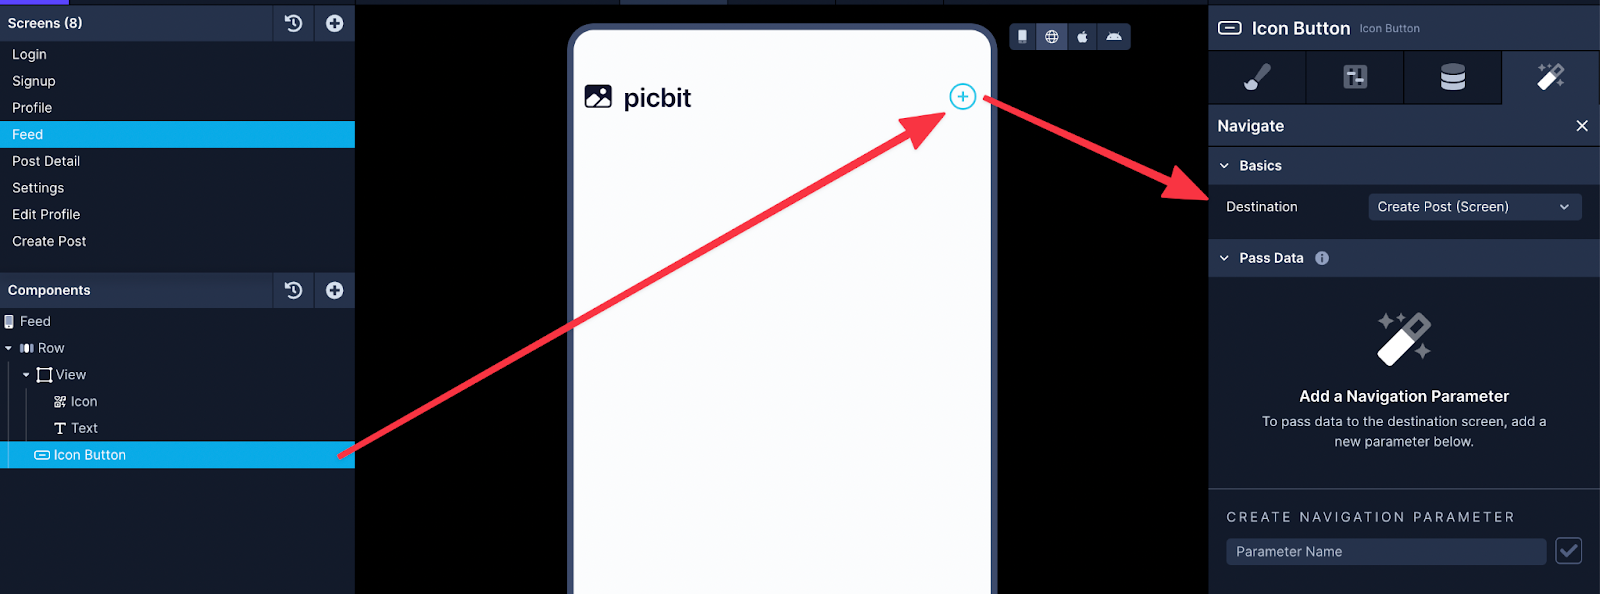
Start by editing the Feed screen. Next, add an Icon Button component to allow the app user to navigate to the Create Post screen. Next, add a Navigate action to this Icon Button.
Then let’s add a Create Post screen. This screen is responsible for creating a post. The image can either be selected from the device’s media library or taken using a device’s camera. Both of these actions can be mapped as interactions on a Button or a Touchable component. You do not have to write custom code to add these features to your app.
Let’s start by creating an app variable in Draftbit’s Project Settings. It will help us save the reference of the image selected and display it on the Create Post screen before actually creating the post. Add IMAGE in Project Settings > App Variables. You can also provide a default value as an image URL. It will act as the placeholder image when navigating to the Create Post screen.

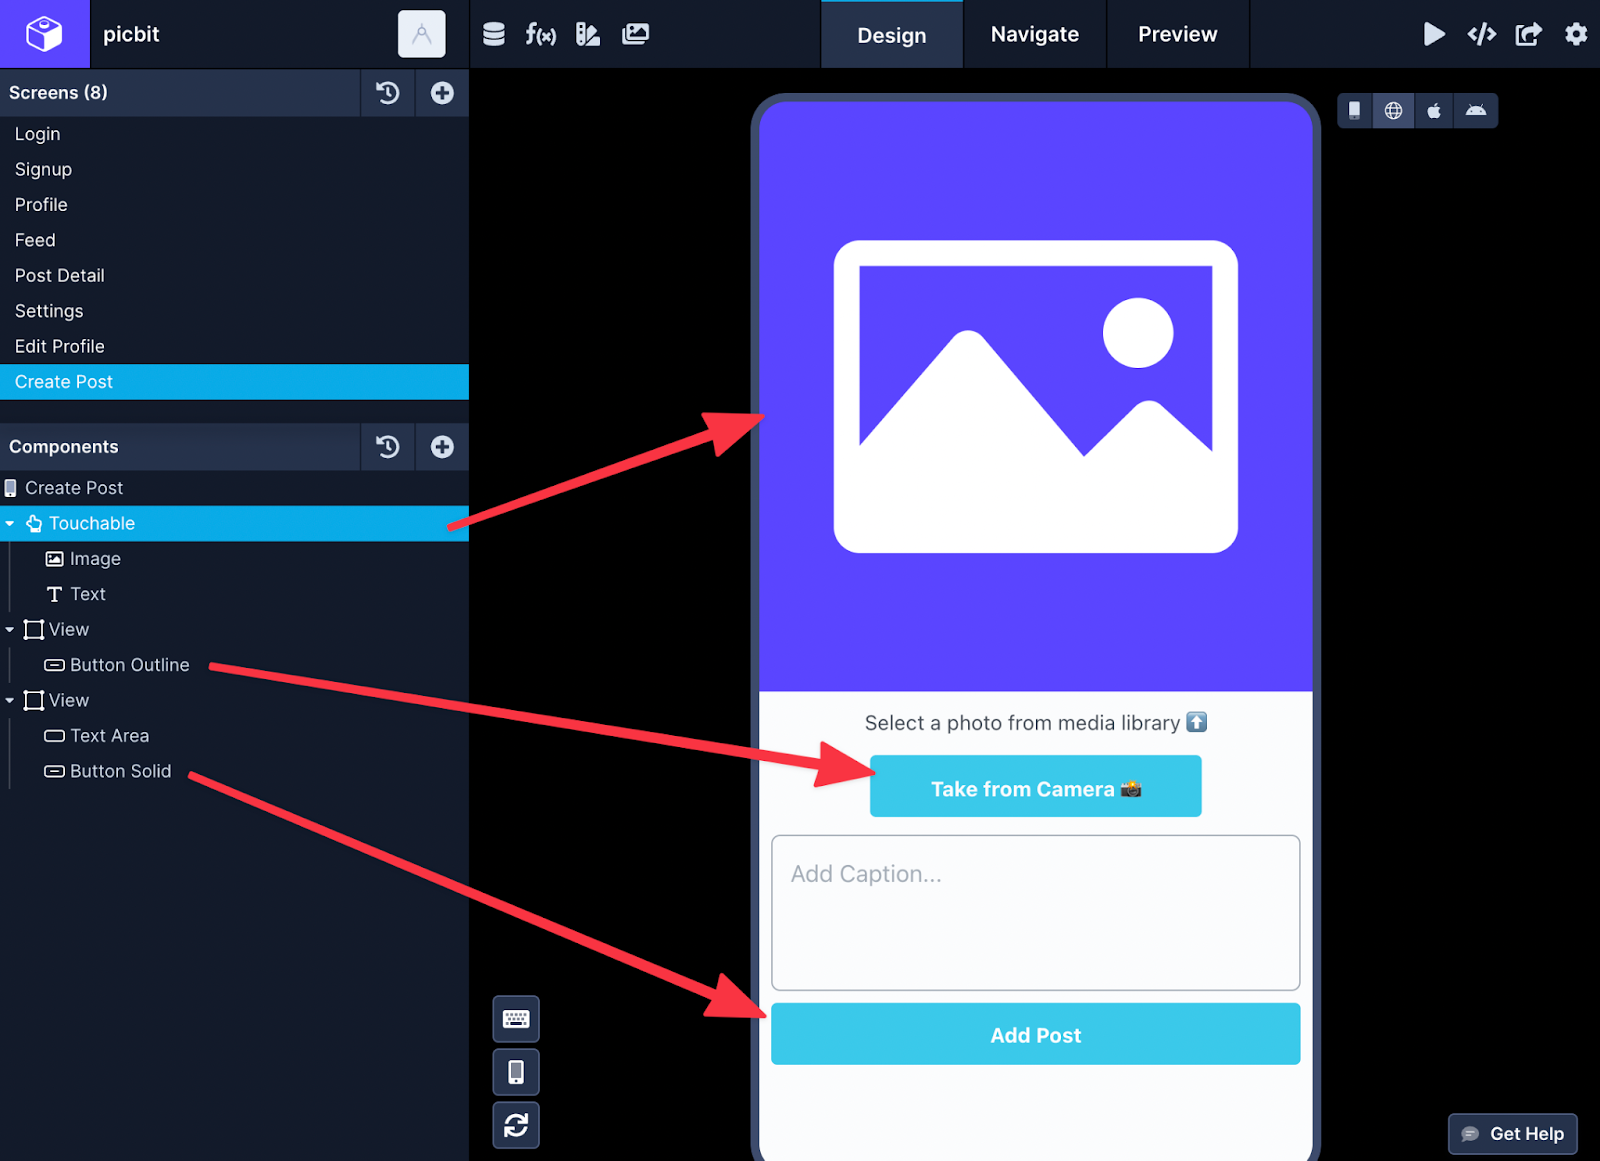
In the Create Post screen, there is one Touchable component that wraps the Image component. If you press the image placeholder, it will open the device’s media library. There is also another Button Outline component that allows one to take pictures from a device’s camera.
There is also a Text Area component to add a caption for the post and a Button to create the post by sending the post request to /photo endpoint.
Draftbit allows dynamic variables to be set on the Image component. This is where the App Variable IMAGE comes in handy.
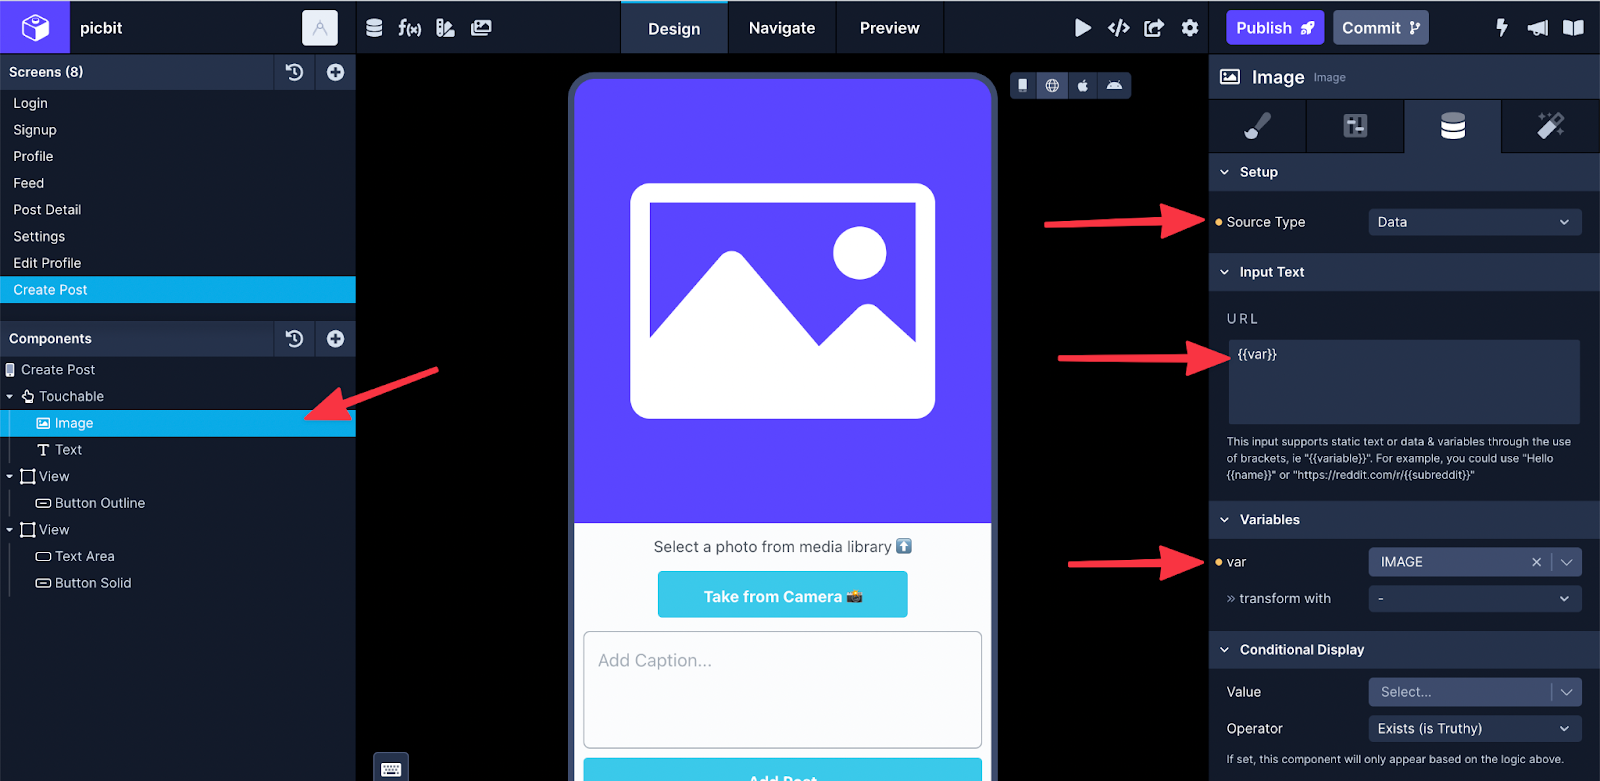
Select the Image component in the Components tree, and go to Data (third tab) in the Properties panel.
- From the dropdown, select Data as the value of Source Type.
- Under Input Text > URL, define a custom variable wrapped in curly braces like {{var}}.
- Under Variables, set the value for Variables to App Variable IMAGE.
Now, let’s add the actions to select the image from the Touchable component. Select it in the components tree, go to Interactions (last tab) in the Properties panel. Add the first action, Open Image Picker:
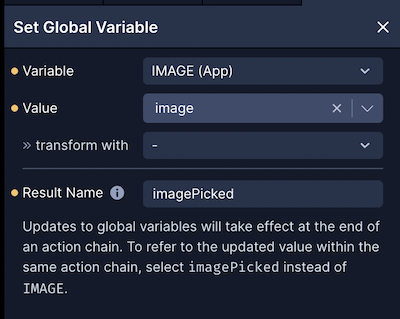
You will have to define a custom Result Name variable image to use it in the next action, Set Global Variable. This will add the value from the previous action to the Global Variable.
Now, select the Button Outline beneath the Image component to add the Open Camera action. The contents of this action are similar to the Open Image Picker.
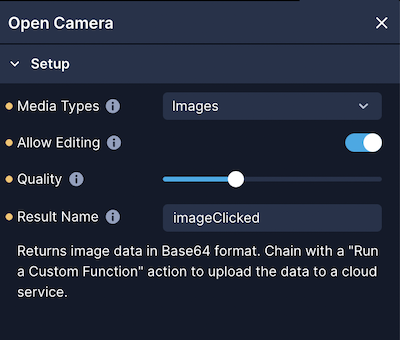
Chain the Set Global Variable action to it as did with Open Image Picker.
You can test the Open Image Picker using either iOS or Android emulators provided in the Preview mode.
Scan the QR code under Live Preview in an Expo Go app installed on a physical device to test the Open Camera action.
How to send an API request to create a post
On the third button on the Create Post screen, let’s chain two actions: API request and Navigate.
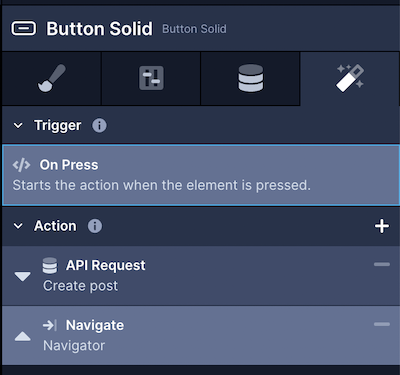
Add the first action to send the API request to Xano. After that, the value of the image comes from the App Variable.
After creating the post, add the “Navigate” action such that it allows the user to navigate back to the Feed screen. Here is the complete flow. To test it, you will have to log in to the app.
After creating the post, go to photo database table in Xano. You will find the record.
How to display posts on the Feed screen
In Xano’s API group, the endpoint /wall is used to get all the photos associated with the authenticated user account. We will use this endpoint to display the posts created by the authenticated user and display them for the ongoing example.
Start by adding the endpoint /wall in your Draftbit’s REST API service.
- In Step 1: add the name of the endpoint and set the Method to GET. Set the Role to Get many since this endpoint will contain more than one post. Set the Object Type to photos.
- In Step 2: add the endpoint: /wall.
- In Step 3: add the Authorization header and set its value to AUTH_TOKEN.
- In Step 4: Click Test to test and verify the endpoint.
The Feed screen’s Component tree layout is shown below. It contains a Fetch component to fetch the data from the /wall endpoint. This List component maps the items array available in the endpoint’s response. This array contains all the details about the post and the user who created that post.
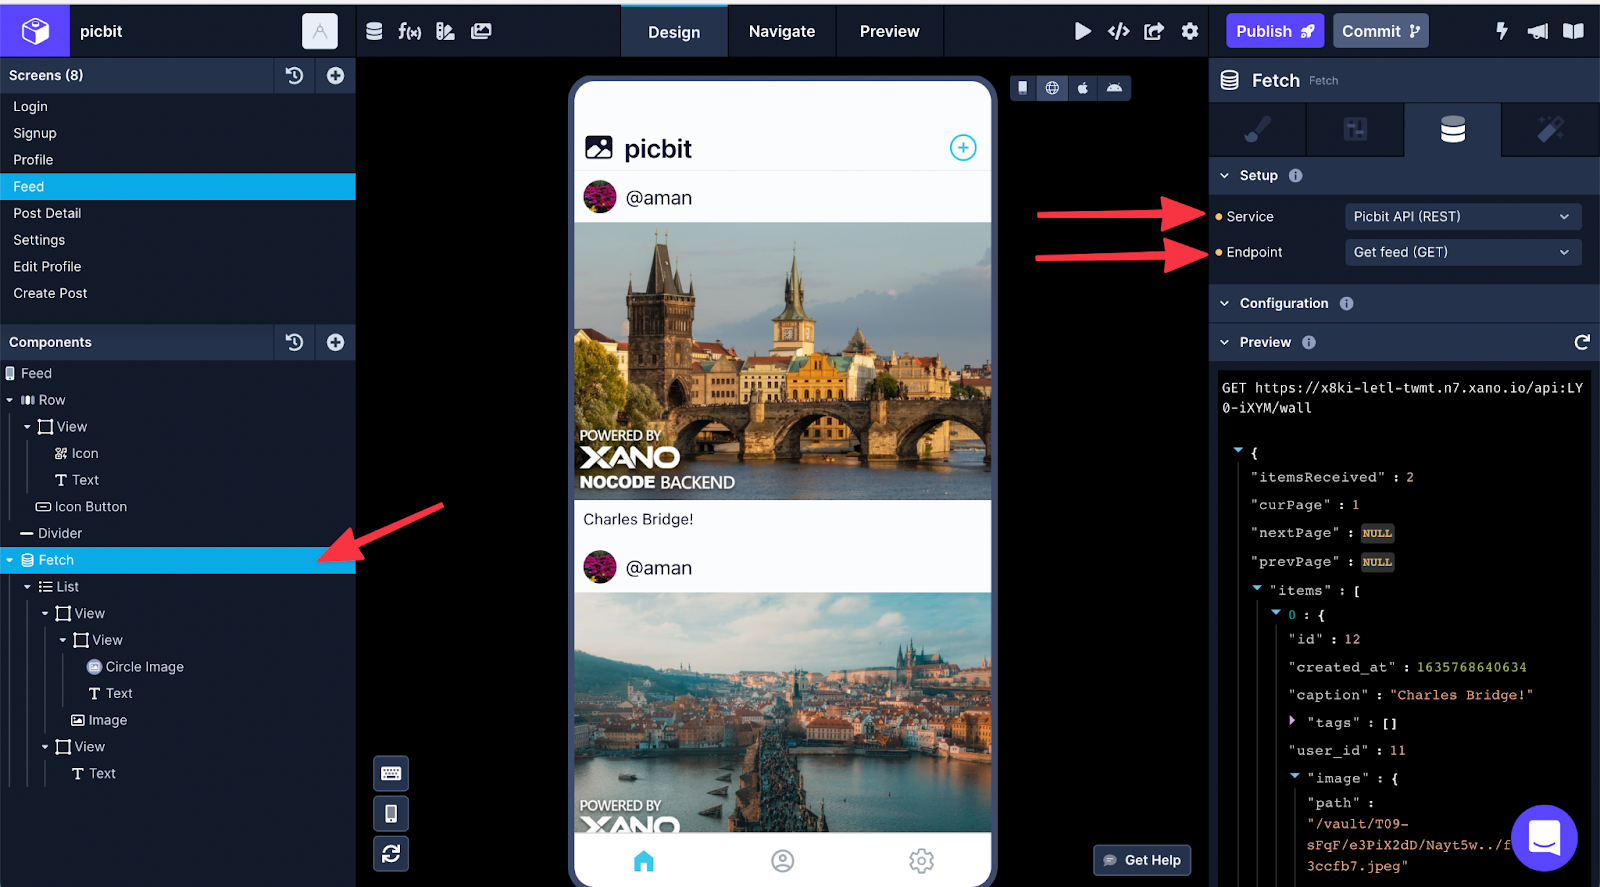
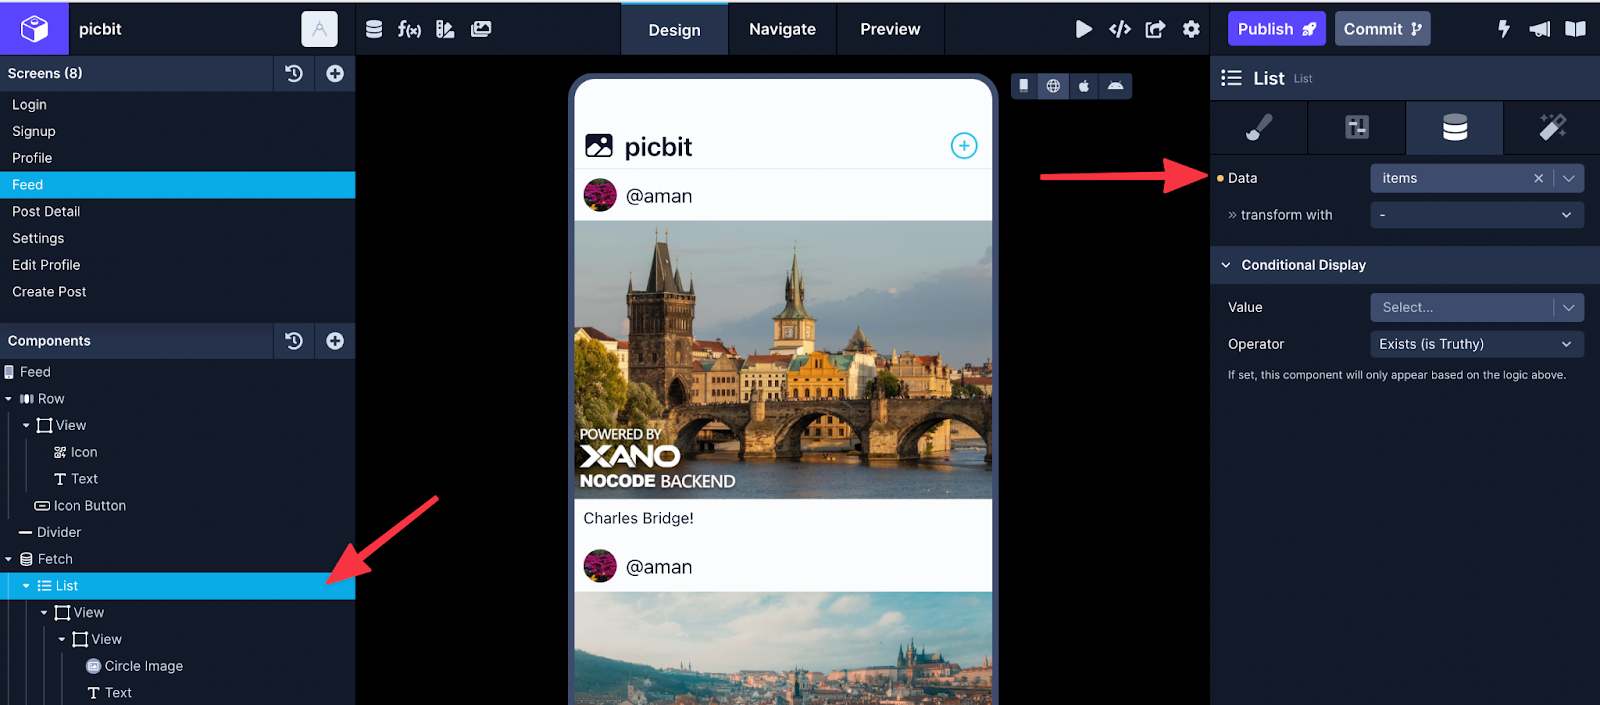
The rest of the components are used to display necessary information from the items array.
Testing the app so far
Let’s run a test of the features that have been implemented so far—starting from creating a new post to navigating back to the Feed screen to view all the posts.
Conclusion
That’s it! You’ve learned how to create a minimum viable Instagram clone with a user’s profile and feed screen in this article. It also covered how to upload images from a device’s media library and use a camera on a physical device using No-code actions in Draftbit. Finally, this article also covered how to modify endpoints in Xano to upload an image file in base64 format and create endpoints in Draftbit to implement the same features.
In Part 3, we will show how to add functionalities like liking a photo, adding a comment to the photo, and following another user account.
Further reading:
- What is Base64 format?
- REST API integrations available in Draftbit
- Fetching and Submitting Data in a Draftbit app
- Ask for Help in the Draftbit community