
How to create a native mobile app for your Xano back-end
In this tutorial, we'll show you how to build the core CRUD functionalities of a mobile app from scratch using a Xano back-end. The mobile app will be built in open-source React Native using Draftbit, a low-code visual development platform. Apps built in Draftbit can be published to the iOS and Android app stores.
 Nick Selmanon September 7, 2021
In this tutorial, I will show you how to build the core CRUD functionalities of a mobile app from scratch using a Xano back-end. The mobile app will be built in open-source React Native using Draftbit, a low-code visual development platform. Apps built in Draftbit can be published to the iOS and Android app stores. Draftbit ships a preconfigured Xano integration — see what’s included before you start.
Draftbit apps can be connected to virtually any back-end-as-a-service (BaaS) platform via REST API. So if you are using Xano alternatives like Backendless, Supabase, or Contentful then — chances are — there’s a guide for those as well.
Introduction
This tutorial is for anyone who already has a Xano back-end. I will show you what API endpoints need to be returned from Xano, but it’ll be up to you to construct those endpoints for your data in Xano. Luckily, Xano makes that easy (as you’ll soon see!).
What this tutorial will cover:
- Connect a Xano back-end to Draftbit
GET : Populate a List View screen with list data from Xano GET : Populate an Item View screen with single-item data from Xano POST : Create a new record in a Xano database
Going further: In future tutorials, I will show you how to create PATCH (update a record in a Xano database) and DELETE (delete a record in a Xano database) requests from Draftbit. I will also show you how to set up EMAIL/PASSWORD AUTHENTICATION for a Xano back-end in Draftbit, including Sign Up, Sign In, and Log Out. I will also show you how to make your CRUD requests authenticated, which allows your app to be multi-user. Subscribe to Draftbit so you don’t miss that one!
UPDATE: Click on the CAPITALIZED links above for Draftbit documentation on Patch, Delete, and Auth.
Set up your data & API in Xano
If you do not have a Xano account, create one here. Once you have a Xano account, you need to create a new database. Here’s how:
- Go to the Database tab from the left menu bar and click the button
Add Table . - Create a
TABLE NAME , add a DESCRIPTION , and make sure to check ADD BASIC CRUD ENDPOINTS to allow Xano to generate API endpoints for CRUD operations. - Click
Add Table to generate the table.
We are using a custom data table for this documentation in a database called
model : {Model S, LaFerrari} manufacturer : {Tesla, Ferrari}

Great! Now that we’ve got a table with some data in it, let’s use it. We need to use the REST API that Xano provides to access the data. All of your API endpoints can be found in the API submenu on the left-hand side of Xano’s dashboard. Let’s go there now.
Before we set up any endpoints, we need the Base URL that Xano gives us. It can be found in the upper-right corner of your API page. The Base URL will be in the format
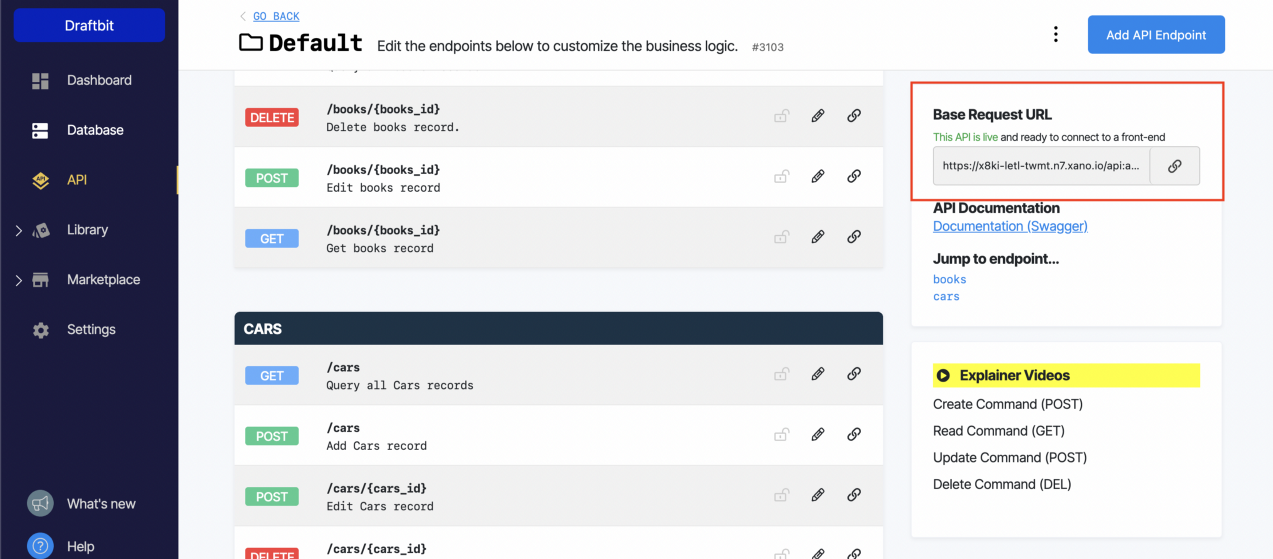
Copy your Base URL to your clipboard, and let’s head over to Draftbit!
Set up your Draftbit front-end
If you don’t have a Draftbit account, create one here. Once you’ve got your account set up, Create a New App. For this demo, you can select
Connect Xano to Draftbit
Still got that Base URL copied to your clipboard? Great!
To add the Xano API Base URL in your Draftbit app, open the
Now that we’ve got the Xano base service connecting to a Draftbit app, we can utilize all of Xano’s HTTP methods to access and manipulate data.
As a refresher, we are going to GET a list of data, GET an individual item, POST a new item, PATCH a record, and DELETE a record in the sub-tutorials below.
GET: Populate a List View screen with list data from Xano
In a blank screen in Draftbit, add a nested Fetch component, List component, View component, and a Text component so that your Layout Tree looks something like the screenshot below.
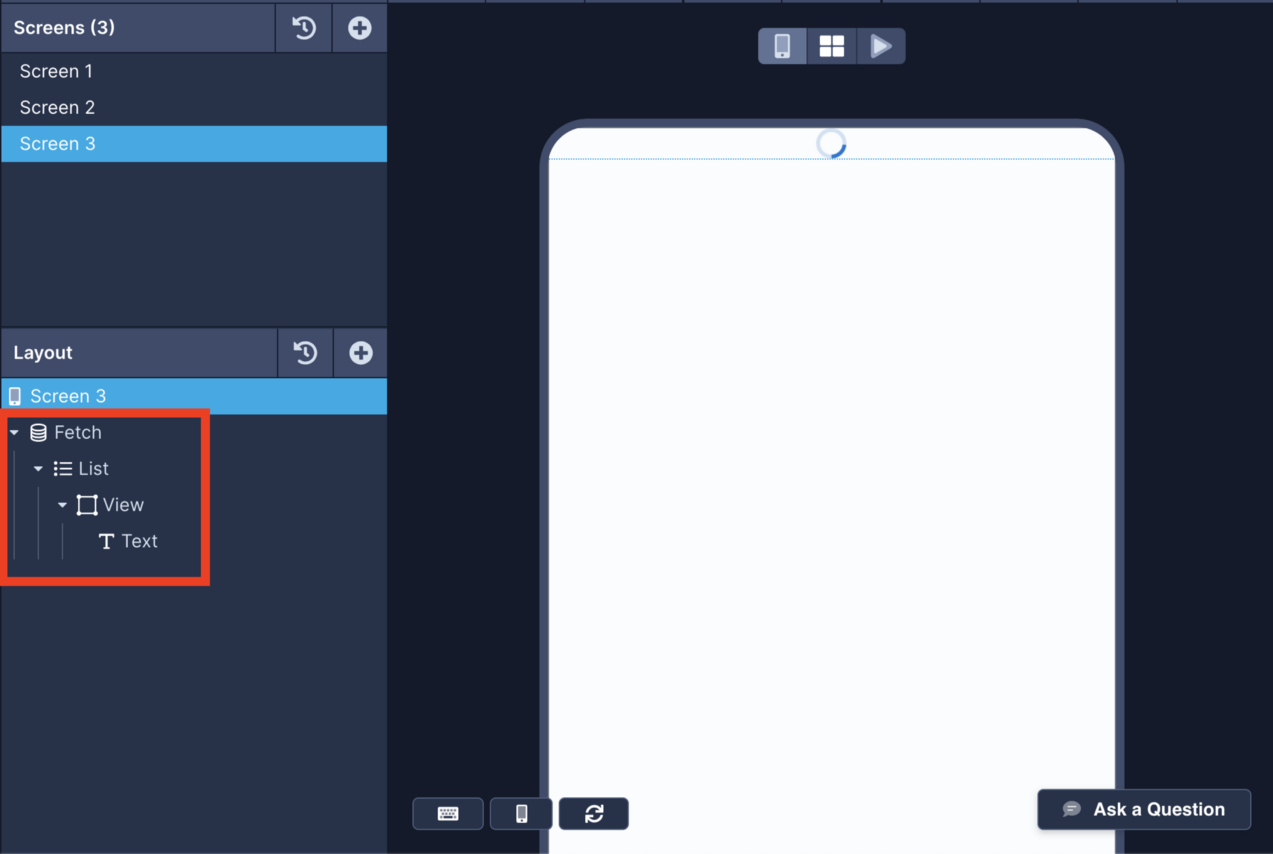
Your screen will be empty/show a loading indicator and that’s ok! We still need to GET data to populate the component(s) on the screen with. Let’s do that now.
These next several steps are illustrated in the GIF below. Open the Data menu again, from the left-hand navbar. Select your Xano base service, and now let’s Add Endpoint. In Step 1, name your endpoint and leave
Save & close the modal.
Now, we need to map the GET request’s response to the components on your screen in Draftbit.
These next several steps are illustrated in the GIF below. First, select the Fetch component in the Layout Tree. From the Data tab of the Properties panel (3rd from the left), select the Xano base service and GET endpoint you have just created. You should see the same JSON response in the Fetch Preview that you saw when Testing the GET endpoint in the Data modal.
Next, select the List component in the Layout Tree. From the Data tab, select the Top-level Response for its Data field. Note: Even though the components on your screen are still empty, you should now see that the Fetch-List is iterating over each item in your GET request because there will be >1 “empty” component on your screen.
Now you’re ready to map data variables to components. Select each component in your Fetch-List (e.g. Text, Image, Video, Button) and map data variables to the components from their respective Data tabs. In our simplistic example, we typed two data variables into a single Text component:
If you did this right, you should see a populated list of fetched data from your endpoint, like so:
GET: Populate an Item View screen with single-item data from Xano
In a blank screen in Draftbit, add a nested Fetch component, View component, and a Text component so that your Layout Tree looks something like the screenshot below.
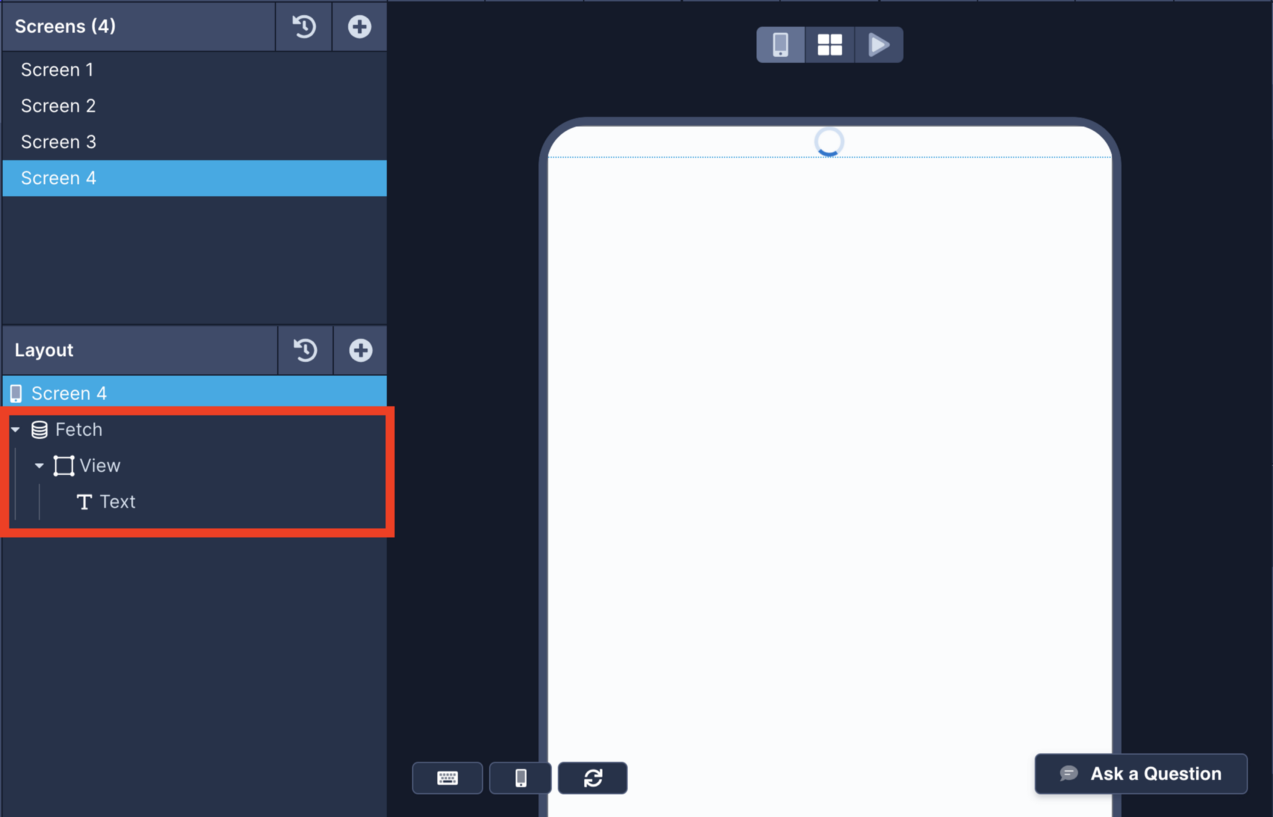
Your screen will be empty/show a loading indicator and that’s ok! We still need to GET data to populate the component(s) on the screen with. Let’s do that now.
These next several steps are illustrated in the GIF below. Open the Data menu again, from the left-hand navbar. Select your Xano base service, and now let’s Add Endpoint. In Step 1, name your endpoint and leave
Save & close the modal.

Now, we need to map the GET request’s response to the components on your screen in Draftbit.
First, select the Fetch component in the Layout Tree. From the Data tab of the Properties panel (3rd from the left), select the Xano base service and GET endpoint you have just created. You should see the same JSON response in the Fetch Preview that you saw when Testing the GET endpoint in the Data modal.
Now you’re ready to map data variables to components. Select each component in your Fetch-List (e.g. Text, Image, Video, Button) and map data variables to the components from their respective Data tabs. In our simplistic example, we typed two data variables into a single Text component:
If you did this right, you should see a single item populated with fetched data from your endpoint, like so:

POST: Create a new record in a Xano database
Now that we’ve got the hang of fetching data from a Xano back-end into our mobile app front-end, let’s try creating a new record.
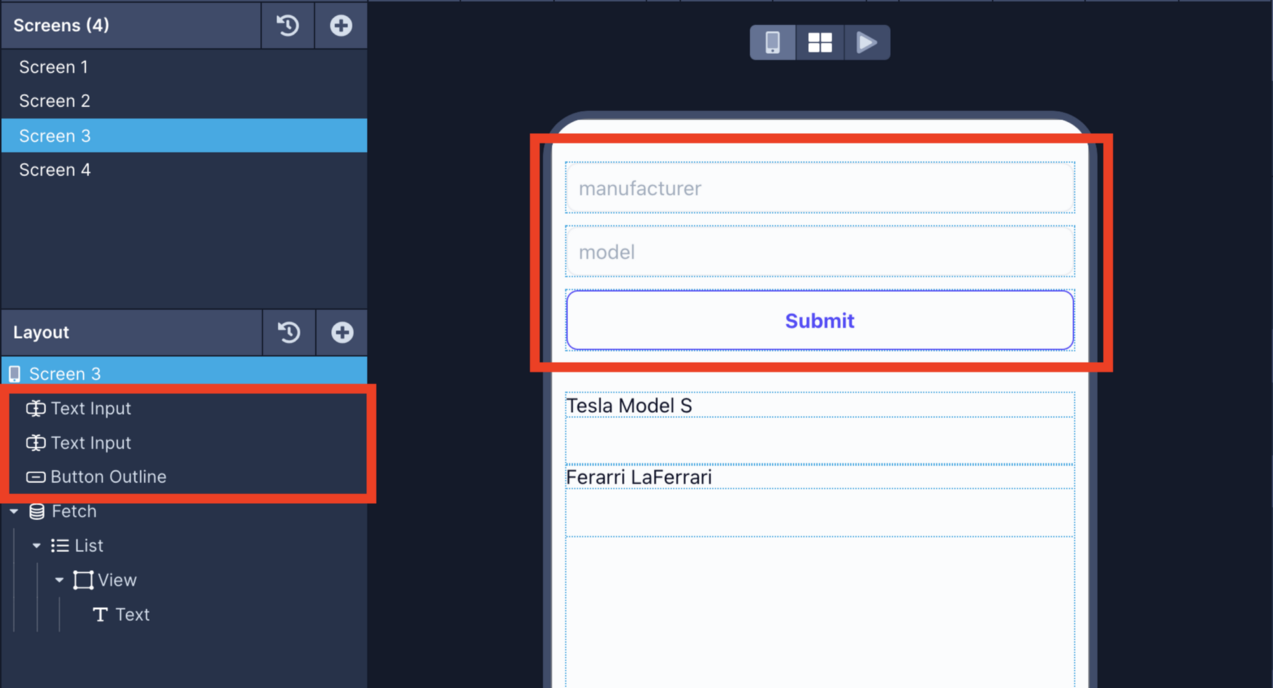
For this section, you need to use at least one component that:
- accepts user input and
- has a
Field Name prop to POST data using Xano REST API.
Examples of these include:
You’ll also need a Touchable component (such as a Button) to attach the POST action.
With the components in place, let’s create our POST endpoint.
Open the Data menu again, from the left-hand navbar. Select your Xano base service, and now let’s Add Endpoint. In Step 1, name your endpoint and select
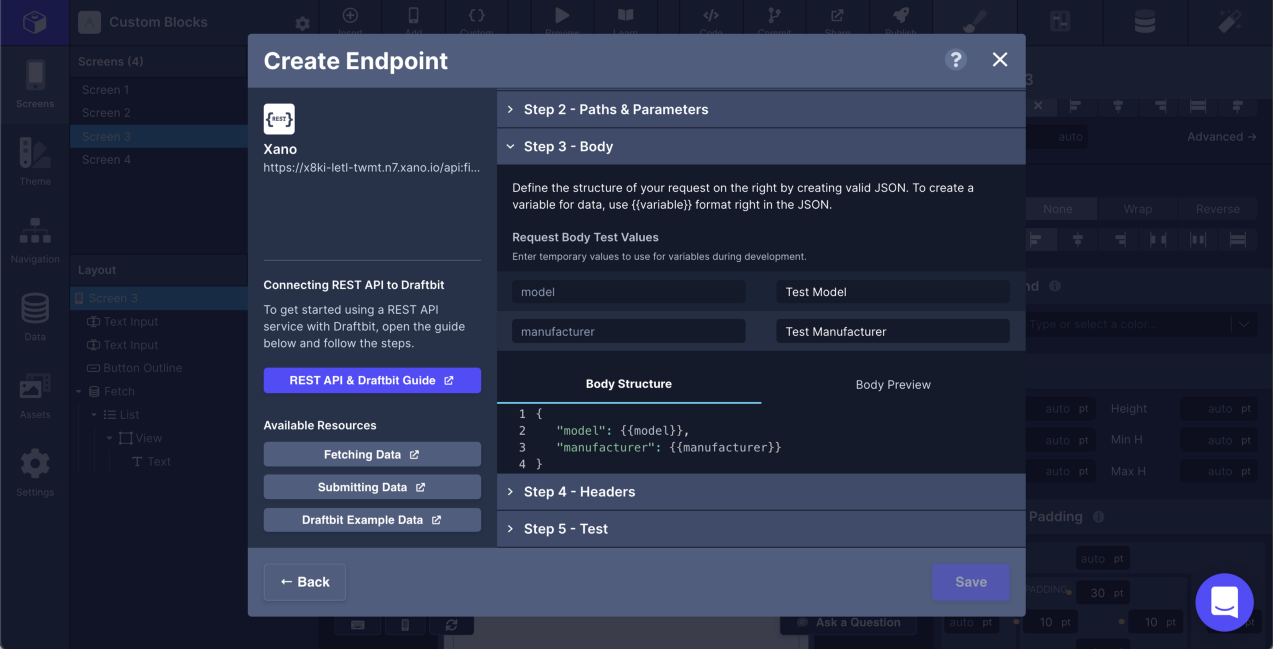
In Step 3, we need to define the JSON Body Structure that is going to shape the request. This Body Structure depends on the shape of your data, and can be found in the Run & Debug menu of your Endpoint debugger in Xano.

For our simple example, the Body Structure will look like this:
{
“model”: {{model}},
“manufacturer”: {{manufacturer}}
}
Set test values for your two data variables.
You can safely skip Step 4, and in Step 5, click Test to test your endpoint. If you did everything correctly, you should get a
Save and close the modal.

Now that we have a POST request working, let’s attach it to some components in your Draftbit app’s screen.
These next several steps are illustrated in the GIF below. First, for each of your input components, make sure that you have set the Field Names (found in the Configs tab, second from the left) to unique values. I recommend you name them identical to your data table’s field names. In my simplistic example, I’ve named my two Text Input components’ field names “manufacturer” and “model,” respectively.
Next, on your Touchable component (in my example, it’s a Button Outline), go to the Actions tab (far-right-hand side). Configure a new Action for On Tap:
Now you’re ready to Test! Put your app into Browser Preview or Live Preview mode, enter some values into your Input components, and then tap your Touchable to POST the data to Xano.
Note: If your screen is set up like mine above, you won’t automatically see the new data in your on-screen List. That’s because Xano’s GET HTTP request isn’t “real-time” (i.e. it’s not continuously fetching). To see if your data was successfully posted to Xano, just refresh Draftbit in your browser and — voila! — there’s your new list item. You should also see the new item in your Xano database.
If you weren’t successful, the most common reasons are typos in field names or data variables, so go back and double-check those! If you’re still struggling, come and talk to us in the Draftbit Community.
Wrapping up
Sending data to, and Receiving data from, the back-end (in this case, Xano) are the foundation of client-server interactions in mobile apps. In the above tutorial, we showed you how to GET list items and single items from Xano in Draftbit, and how to POST an item from Draftbit into Xano.
In future tutorials, we’ll cover how to PATCH and DELETE data in Xano from Draftbit. We’ll also show you how to Authenticate users of your Draftbit app with Email/Password, and how to make authenticated requests to the server.
—
If you enjoyed this tutorial, please give Draftbit, Xano, and Nick a shoutout on Twitter. And if you need help or have questions, visit us at the Draftbit Community forums.